OAuth2
OAuth2是什么
OAuth不是API或者服务,它是一种授权机制,一个验证授权的开放标准,提供了一种安全访问受保护资源的方式。
OAuth主要是解决认证协议的通用标准问题,因为要实现跨系统认证,各系统之间要遵循一定的协议。AUTH协议为用户资源的授权提供了一个安全的、开放而又简易的标准。互联网的各个服务都遵循这个标准的话,那大家就可以都按照协议的规定来进行认证,来实现关于认证这块业务的打通。
OAuth2则是OAuth的一个版本。OAuth的1.0版本过于复杂,现在广泛采用2.0的版本,也就是OAuth2。
官方文档地址:https://oauth.net/2/
OAuth2可以解决什么问题
举一个Oauth2认证的实例,比如我们要登录百度网盘,即可以百度帐户登录,同时也支持用第三方账号登录,比如说新浪微博账号、qq账号和微信账号。
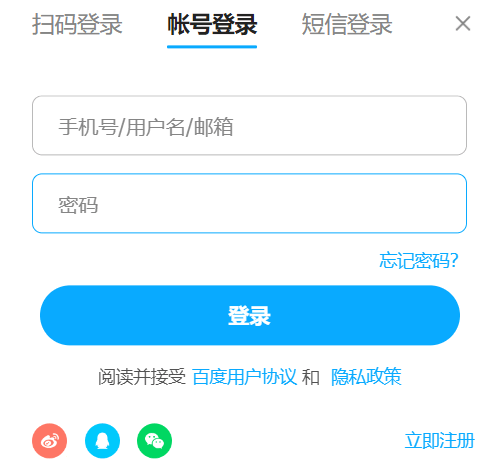
假设我们使用qq账号登录,那么整个认证登录的过程可以描述为下图。

包括主要步骤为:
- 百度网盘客户端请求第三方授权
用户进入百度网盘的登录页面,点击QQ的图标以QQ账号登录QQ系统。
- 用户同意给客户端授权
QQ会对资源拥有者的身份进行验证(比如登录qq账号,或者用已登录qq帐户的移动端app扫码等), 验证通过后,QQ会询问用户是否给授权百度网盘访问自己的QQ数据,用户点击“确认登录”表示同意授权,QQ认证服务器会颁发一个授权码,并重定向到百度网盘的网站。
- 百度网盘客户端获取到授权码后,会向QQ系统认证服务器申请令牌。此过程用户是看不到的,并且客户端请求的时候需要携带授权码。
- QQ认证服务器对授权码进行验证,如果合法则给客户端颁发令牌,并且用户也成功在百度网盘客户端成功登录。
- 百度网盘客户端拿到了QQ认证服务器的令牌后,就可以携带令牌访问QQ用户资源相关服务获取用户的基本信息。
上面是一个使用第三方账号登录的例子,另外一种常见的应用就是同一个帐户在公司不同的业务线上都可以使用,或者不同的端上使用,不同的业务、不同的客户端,后端服务一般是独立的,但是会有一个单独的认证服务去专门做帐户认证相关的逻辑。
OAuth2的几个概念
客户端(client):就是我们想要使用的一个服务,比如上面的百度网盘,它可以通过一些第三方的账号来登录。
资源拥有者:通常就是指的用户。
认证服务器(Authorization server):也称作授权服务器,它用来验证用户登录是否有效,如果有效的话并且用户同意的话就授权客户端去访问资源服务器上用户信息的权限。
资源服务器(Resource server):它是保存用户资源的一方。比如上面例子中客户端携带令牌,可以访问资源服务器获取用户信息。当然,资源服务器的资源并不单单是指用户信息,而是包括各种跟用户相关的接口等。
OAuth2的4种授权方式
OAuth2协议定义了四种获得令牌的授权方式(authorization grant )如下:
- 授权码(authorization code)
- 隐藏模式(implicit)
- 密码模式(password)
- 客户端凭证(client credentials)
授权码模式
上面介绍的用QQ帐户登录百度网盘的例子就是用的授权码码模式,其流程图如下。
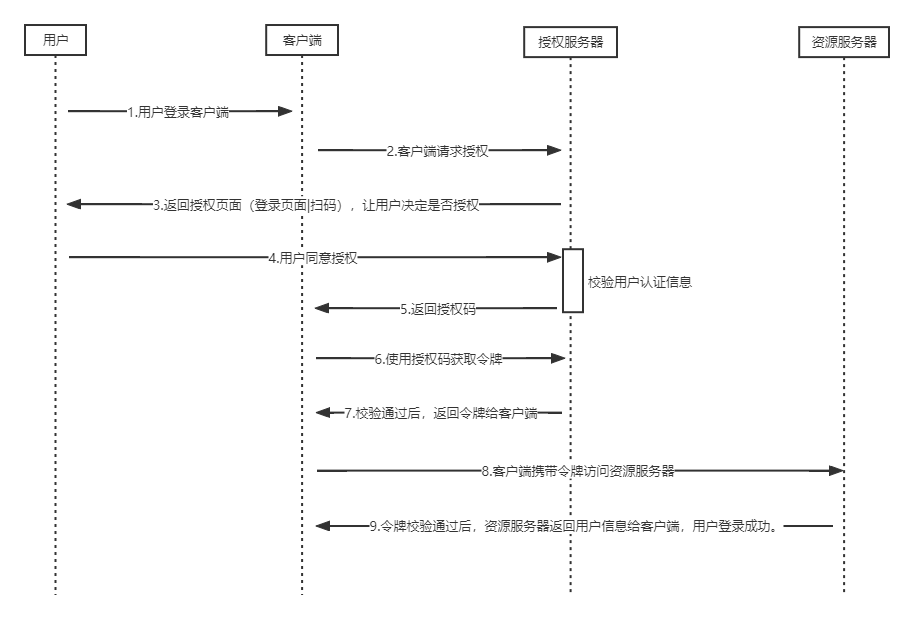
授权码模式是功能最完整、流程最严密的授权模式,也是最常使用的模式。
授权码模式的流程中会涉及如下几个重要的请求接口:
- 请求授权
1
2
3
4
5
| https://xxx.com/authorize?
response_type=code& #请求返回授权码
client_id=CLIENT_ID&
redirect_uri=xxx& #重定向地址
scope=write #申请读权限
|
- 用户同意后中,根据rediect_url重定向带上授权码。
1
| https:/xxx.com/callback?code=xxx
|
- 客户端收到授权码后,带授权码和密钥等参数申请令牌。
1
2
3
4
5
6
| https://xxx.com?
body:
client_id=CLIENT_ID
client_secret=CLIENT_SECRET # 客户端的认证
grant_type=authorization_code #授权方式为授权码模式
code=xxx #回调返回的code码
|
验证授权码后返回token。
隐藏式模式
此种模式很少被使用,在此先不详细讲述。
密码模式
密码模式比较好理解,用户在客户端输入自己在某个平台的用户名和密码,客户端拿着用户的这个登录信息直接去授权服务申请令牌,请求响应返回token。grant_type 为 password 表示密码式授权。
1
2
3
4
5
6
| https://xxx.com/token?
grant_type=password&
username=xxx&
password=xxx&
client_id=clientId&
client_secret=clientSecret
|
这种授权方式有个缺点,就是我们要把平台的用户名和密码暴露给客户端,如果采取此方式授权,该应用一定是可以高度信任的。
常见的一种情况就是某个公司有好多个不同的产品,公司的帐户系统是一个,那就可以用这一个帐户去登录不同的产品,这种是没有问题的。比如我在百度地图、百度文库等应用上,都输入了百度的帐户和密码来登录,就没有安全问题。还有一种情况是像12306这种没有提供遵循Oauth2规范的认证和授权服务,当我们在飞猪等软件上买火车票,就得要在飞猪上输入12306的账号和密码,飞猪这些售票平台才能去访问12306上的一些资源,帮我们购票。
客户端凭证
客户端凭证模式和密码模式很相似,但这种模式不需要用户输入密码,一般是用于两个服务端的通信(不存在前端应用)。常见的比如客户端(调用方)通过client_id和client_secret从认证服务器获取访问令牌。
1
2
3
4
| https://xxx.com/token?
grant_type=client_credentials&
client_id=XXX&
client_secret=xxx
|
Spring-Security-OAuth2
Spring Security也提供了对OAuth2的支持,引入相关的jar包后可以很方便地开发。下面通过一个demo介绍一下密码模式和客户端凭证模式的用法,demo分为两个模块:授权服务器模块和资源服务器模块。
1
2
| <module>springsecurity-oauth2-authserver</module>
<module>springsecurity-oauth2-resourceserver</module>
|
首先要在pom.xml文件中引入关键的几个依赖:
1
2
3
4
5
6
7
8
9
10
11
12
13
14
15
16
17
| <dependency>
<groupId>org.springframework.boot</groupId>
<artifactId>spring-boot-starter-web</artifactId>
<version>2.1.5.RELEASE</version>
</dependency>
<dependency>
<groupId>org.springframework.boot</groupId>
<artifactId>spring-boot-starter-security</artifactId>
<version>2.1.5.RELEASE</version>
</dependency>
<dependency>
<groupId>org.springframework.cloud</groupId>
<artifactId>spring-cloud-starter-oauth2</artifactId>
<version>2.1.5.RELEASE</version>
</dependency>
|
OAuth2密码模式demo
授权服务器
我们看看授权服务器要怎么搭建。
在本节的例子中,我们将用户、客户端和token等信息保存在数据库,这需要我们创建几个Spring Security Oauth2中默认的表,具体有哪些表可以参考:https://github.com/spring-attic/spring-security-oauth/blob/main/spring-security-oauth2/src/test/resources/schema.sql
- 客户端详情表
1
2
3
4
5
6
7
8
9
10
11
12
13
14
15
| create table oauth_client_details
(
client_id VARCHAR(256) PRIMARY KEY comment '必填,Oauth2 client_id',
resource_ids VARCHAR(256) comment '可选,资源id集合,多个资源用英文逗号隔开',
client_secret VARCHAR(256) comment '必填,Oauth2 client_secret',
scope VARCHAR(256) comment '必填,Oauth2 权限范围,比如 read,write等可自定义',
authorized_grant_types VARCHAR(256) comment '必填,Oauth2 授权类型,支持类型:authorization_code,password,refresh_token,implicit,client_credentials,多个用英文逗号隔开',
web_server_redirect_uri VARCHAR(256) comment '可选,客户端的重定向URI,当grant_type为authorization_code或implicit时,此字段是需要的',
authorities VARCHAR(256) comment '可选,指定客户端所拥有的Spring Security的权限值',
access_token_validity INTEGER comment '可选,access_token的有效时间值(单位:秒),不填写框架(类refreshTokenValiditySeconds)默认12小时',
refresh_token_validity INTEGER comment '可选,refresh_token的有效时间值(单位:秒),不填写框架(类refreshTokenValiditySeconds)默认30天',
additional_information VARCHAR(4096) comment '预留字段,格式必须是json',
autoapprove VARCHAR(256) comment '该字段适用于grant_type="authorization_code"的情况下,用户是否自动approve操作'
);
|
并插入一条数据:
1
2
3
4
5
6
| INSERT INTO oauth_client_details (
client_id, resource_ids, client_secret, scope, authorized_grant_types
) VALUES (
'client_a', 'resource_a', '$2a$10$8U.XYzrVF.yDvMT37NX0g.UiX8wppGasPOFgug8OoWi1iOfa4.5x6', 'scope_a', 'password'
);
|
- token存储表
1
2
3
4
5
6
7
8
9
10
11
12
| token 存储
create table oauth_access_token
(
token_id VARCHAR(256) comment 'MD5加密后存储的access_token',
token BLOB comment 'access_token序列化的二进制数据格式',
authentication_id VARCHAR(256) PRIMARY KEY comment '主键,其值是根据当前的username(如果有),client_id与scope通过MD5加密生成的,具体实现参见DefaultAuthenticationKeyGenerator',
user_name VARCHAR(256),
client_id VARCHAR(256),
authentication BLOB comment '将OAuth2Authentication对象序列化后的二进制数据',
refresh_token VARCHAR(256) comment 'refresh_token的MD5加密后的数据'
);
|
再创建基于角色控制权限的两个表。
- 角色表
1
2
3
4
5
6
7
8
| CREATE TABLE `role` (
`id` int(20) NOT NULL PRIMARY KEY AUTO_INCREMENT,
`name` varchar(64) NOT NULL COMMENT '角色名称',
`code` varchar(64) NOT NULL COMMENT '角色英文代码',
`description` varchar(200) DEFAULT NULL COMMENT '备注',
`create_time` timestamp NOT NULL DEFAULT NOW(),
`update_time` timestamp NOT NULL DEFAULT NOW()
) COMMENT='角色表';
|
插入几条测试数据:
1
2
3
4
5
| INSERT INTO role(`NAME`, `CODE`)
VALUES ('管理员', 'admin'),
('普通用户','user'),
('财务人员','financial'),
('客户经理','cust_manager');
|
2. 用户角色关系表
1
2
3
4
5
| CREATE TABLE `user_role` (
`id` INT(20) NOT NULL PRIMARY KEY AUTO_INCREMENT,
`user_id` INT(20) NOT NULL COMMENT '用户id',
`role_id` INT(20) NOT NULL COMMENT '角色id'
) COMMENT='用户角色关系表';
|
也插入几条数据:
1
2
3
| insert into user_role(user_id, role_id)
values(1, 1),
(2, 4);
|
接下来介绍一下spring-security-oauth2中一个重要的注解:@EnableAuthorizationServer。查看这个注解的源码可以看到它会导入AuthorizationServerSecurityConfiguration和AuthorizationServerEndpointsConfiguration两个配置类。
AuthorizationServerEndpointsConfiguration,顾名思义,是跟端点(Endpoints)相关的配置,端点可简单理解为相对应的一个url,在AuthorizationServerEndpointsConfiguration中配置了两个端点实例:AuthorizationEndpoint和TokenEndpoint。
AuthorizationEndpoint中包含和认证相关的端点,例如:/oauth/authorize(认证)、/oauth/error(认证失败)、 oauth/confirm_access(确认授权)等。
TokenEndpoint中包含和获取token(令牌)相关的端点,例如:/oauth/token。
1
2
3
4
5
6
7
8
9
10
11
12
13
14
15
16
17
18
19
20
21
22
23
24
25
26
27
28
| @Bean
public AuthorizationEndpoint authorizationEndpoint() throws Exception {
AuthorizationEndpoint authorizationEndpoint = new AuthorizationEndpoint();
FrameworkEndpointHandlerMapping mapping = getEndpointsConfigurer().getFrameworkEndpointHandlerMapping();
authorizationEndpoint.setUserApprovalPage(extractPath(mapping, "/oauth/confirm_access"));
authorizationEndpoint.setProviderExceptionHandler(exceptionTranslator());
authorizationEndpoint.setErrorPage(extractPath(mapping, "/oauth/error"));
authorizationEndpoint.setTokenGranter(tokenGranter());
authorizationEndpoint.setClientDetailsService(clientDetailsService);
authorizationEndpoint.setAuthorizationCodeServices(authorizationCodeServices());
authorizationEndpoint.setOAuth2RequestFactory(oauth2RequestFactory());
authorizationEndpoint.setOAuth2RequestValidator(oauth2RequestValidator());
authorizationEndpoint.setUserApprovalHandler(userApprovalHandler());
authorizationEndpoint.setRedirectResolver(redirectResolver());
return authorizationEndpoint;
}
@Bean
public TokenEndpoint tokenEndpoint() throws Exception {
TokenEndpoint tokenEndpoint = new TokenEndpoint();
tokenEndpoint.setClientDetailsService(clientDetailsService);
tokenEndpoint.setProviderExceptionHandler(exceptionTranslator());
tokenEndpoint.setTokenGranter(tokenGranter());
tokenEndpoint.setOAuth2RequestFactory(oauth2RequestFactory());
tokenEndpoint.setOAuth2RequestValidator(oauth2RequestValidator());
tokenEndpoint.setAllowedRequestMethods(allowedTokenEndpointRequestMethods());
return tokenEndpoint;
}
|
spring-security-oauth2框架自带的端点包括:
/oauth/authorize:授权端点/oauth/token:令牌端点/oauth/confirm_access:用户确认授权提交端点/oauth/error:授权服务错误信息端点/oauth/check_token:用于资源服务访问的令牌解析端点/oauth/token_key:提供公有密匙的端点,如果你使用 JWT 令牌的话
**AuthorizationServerSecurityConfiguration**则是和安全相关的配置,该类继承了WebSecurityConfigurerAdapter,提供了认证服务的一些相关配置,比如对/oauth/token设置为非匿名才能访问、/oauth/token_key和/oauth/check_token默认不允许访问(denyAll),新增了AuthorizationServerSecurityConfigurer的可配置类,用来配置对token的认证请求过滤器,比如ClientCredentialsTokenEndpointFilter,该过滤器会拦截oauth/token请求,并且对client_id和client_secret进行认证。除此之外,还配置了对实现了AuthorizationServerConfigurer的类进行回调,这样的话,只要实现AuthorizationServerConfigurer接口就可以自由的对认证服务进行相关的业务配置。
另外一个spring-security-oauth2重要的类是:AuthorizationServerConfigurerAdapter。它的功能有点类似于前面讲Spring Security中的WebSecurityConfigurerAdapter,是一个核心的配置类,通过继承AuthorizationServerConfigurerAdapter,可以进行自定义的配置。
了解了以上的基础知识后,现在开始搭建授权服务器(AuthorizationServer)。
首先在pom.xml文件引入相关依赖:
1
2
3
4
5
6
7
8
9
10
11
12
13
14
15
16
17
18
19
20
21
22
23
24
25
26
27
28
29
30
31
32
33
34
35
36
37
38
39
40
41
42
43
44
45
| <dependencies>
<dependency>
<groupId>org.springframework.boot</groupId>
<artifactId>spring-boot-starter-web</artifactId>
</dependency>
<dependency>
<groupId>org.springframework.boot</groupId>
<artifactId>spring-boot-starter-security</artifactId>
</dependency>
<dependency>
<groupId>org.springframework.boot</groupId>
<artifactId>spring-boot-starter-test</artifactId>
<scope>test</scope>
</dependency>
<dependency>
<groupId>org.springframework.cloud</groupId>
<artifactId>spring-cloud-starter-oauth2</artifactId>
</dependency>
<dependency>
<groupId>mysql</groupId>
<artifactId>mysql-connector-java</artifactId>
</dependency>
<dependency>
<groupId>org.mybatis.spring.boot</groupId>
<artifactId>mybatis-spring-boot-starter</artifactId>
</dependency>
<dependency>
<groupId>org.projectlombok</groupId>
<artifactId>lombok</artifactId>
<scope>provided</scope>
</dependency>
<dependency>
<groupId>com.lzumetal</groupId>
<artifactId>springsecurity-core</artifactId>
<version>1.0-SNAPSHOT</version>
</dependency>
</dependencies>
|
用户与角色等相关逻辑。
1
2
3
4
5
6
7
8
9
10
11
12
13
14
15
16
17
18
19
20
21
22
23
24
25
26
27
28
29
30
31
32
33
34
35
36
37
38
39
40
41
42
43
44
| package com.lzumetal.springsecurity.oauth2.authserver.service;
import com.lzumetal.springsecurity.oauth2.authserver.entity.SysUser;
import org.springframework.beans.factory.annotation.Autowired;
import org.springframework.security.core.userdetails.UserDetails;
import org.springframework.security.core.userdetails.UserDetailsService;
import org.springframework.security.core.userdetails.UsernameNotFoundException;
import org.springframework.stereotype.Service;
import org.springframework.util.CollectionUtils;
import java.util.Collections;
import java.util.HashSet;
import java.util.List;
@Service(value = "userDetailsServiceImpl")
public class UserDetailsServiceImpl implements UserDetailsService {
@Autowired
private SysUserService sysUserService;
@Autowired
private UserRoleService userRoleService;
@Override
public UserDetails loadUserByUsername(String username) throws UsernameNotFoundException {
SysUser userFromDb = sysUserService.getByUsername(username);
if (userFromDb == null) {
throw new UsernameNotFoundException(username);
}
List<String> roleCodes = userRoleService.getRoleCode(userFromDb.getId());
if (!CollectionUtils.isEmpty(roleCodes)) {
HashSet<String> roleAuths = new HashSet<>();
for (String roleCode : roleCodes) {
roleAuths.add("ROLE_" + roleCode);
}
userFromDb.buildAuthorities(roleAuths);
}
return userFromDb;
}
}
|
1
2
3
4
5
6
7
8
9
10
11
12
13
14
15
16
17
18
19
20
21
22
23
24
25
26
27
| package com.lzumetal.springsecurity.oauth2.authserver.service;
import com.lzumetal.springsecurity.oauth2.authserver.dao.SysUserDao;
import com.lzumetal.springsecurity.oauth2.authserver.entity.SysUser;
import org.apache.commons.lang3.StringUtils;
import org.springframework.beans.factory.annotation.Autowired;
import org.springframework.stereotype.Service;
@Service
public class SysUserService {
@Autowired
private SysUserDao sysUserDao;
public SysUser getByUsername(String username) {
if (StringUtils.isBlank(username)) {
return null;
}
return sysUserDao.selectByUsername(username);
}
}
|
1
2
3
4
5
6
7
8
9
10
11
12
13
14
15
16
17
18
19
20
21
| package com.lzumetal.springsecurity.oauth2.authserver.service;
import com.lzumetal.springsecurity.oauth2.authserver.dao.UserRoleDao;
import org.springframework.beans.factory.annotation.Autowired;
import org.springframework.stereotype.Service;
import java.util.List;
@Service
public class UserRoleService {
@Autowired
private UserRoleDao userRoleDao;
public List<String> getRoleCode(int userId) {
return userRoleDao.selectUserRoleCode(userId);
}
}
|
然后就是授权服务配置相关的类。
1
2
3
4
5
6
7
8
9
10
11
12
13
14
15
16
17
18
19
20
21
22
23
24
25
26
27
28
29
30
31
32
33
34
35
36
37
38
39
40
41
42
43
44
45
46
47
48
49
50
51
52
53
54
55
56
57
58
59
| package com.lzumetal.springsecurity.oauth2.authserver.config;
import org.springframework.beans.factory.annotation.Autowired;
import org.springframework.beans.factory.annotation.Qualifier;
import org.springframework.context.annotation.Bean;
import org.springframework.context.annotation.Configuration;
import org.springframework.security.authentication.AuthenticationManager;
import org.springframework.security.config.annotation.authentication.builders.AuthenticationManagerBuilder;
import org.springframework.security.config.annotation.web.builders.HttpSecurity;
import org.springframework.security.config.annotation.web.configuration.EnableWebSecurity;
import org.springframework.security.config.annotation.web.configuration.WebSecurityConfigurerAdapter;
import org.springframework.security.core.userdetails.UserDetailsService;
import org.springframework.security.crypto.bcrypt.BCryptPasswordEncoder;
import org.springframework.security.crypto.password.PasswordEncoder;
@Configuration
@EnableWebSecurity
public class SpringSecurityConfig extends WebSecurityConfigurerAdapter {
@Qualifier("userDetailsServiceImpl")
@Autowired
private UserDetailsService userDetailsService;
@Bean
public PasswordEncoder passwordEncoder() {
return new BCryptPasswordEncoder();
}
@Bean
@Override
public AuthenticationManager authenticationManagerBean() throws Exception {
AuthenticationManager manager = super.authenticationManagerBean();
return manager;
}
@Override
protected void configure(AuthenticationManagerBuilder auth) throws Exception {
auth.userDetailsService(userDetailsService)
.passwordEncoder(passwordEncoder());
}
@Override
protected void configure(HttpSecurity httpSecurity) throws Exception {
httpSecurity
.csrf().disable()
.authorizeRequests().antMatchers("/oauth/**").permitAll()
;
}
}
|
1
2
3
4
5
6
7
8
9
10
11
12
13
14
15
16
17
18
19
20
21
22
23
24
25
26
27
28
29
30
31
32
33
34
35
36
37
38
39
40
41
42
43
44
45
46
47
48
49
50
51
52
53
54
55
56
57
58
59
60
61
62
63
64
65
66
67
68
69
70
71
72
73
74
75
76
| package com.lzumetal.springsecurity.oauth2.authserver.config;
import org.springframework.beans.factory.annotation.Autowired;
import org.springframework.context.annotation.Bean;
import org.springframework.context.annotation.Configuration;
import org.springframework.http.HttpMethod;
import org.springframework.security.authentication.AuthenticationManager;
import org.springframework.security.crypto.password.PasswordEncoder;
import org.springframework.security.oauth2.config.annotation.configurers.ClientDetailsServiceConfigurer;
import org.springframework.security.oauth2.config.annotation.web.configuration.AuthorizationServerConfigurerAdapter;
import org.springframework.security.oauth2.config.annotation.web.configuration.EnableAuthorizationServer;
import org.springframework.security.oauth2.config.annotation.web.configurers.AuthorizationServerEndpointsConfigurer;
import org.springframework.security.oauth2.config.annotation.web.configurers.AuthorizationServerSecurityConfigurer;
import org.springframework.security.oauth2.provider.token.TokenStore;
import org.springframework.security.oauth2.provider.token.store.JdbcTokenStore;
import javax.sql.DataSource;
@Configuration
@EnableAuthorizationServer
public class OAuth2AuthServerConfig extends AuthorizationServerConfigurerAdapter {
@Autowired
private DataSource dataSource;
@Autowired
private PasswordEncoder passwordEncoder;
@Autowired
private AuthenticationManager authenticationManager;
@Bean
public TokenStore tokenStore() {
return new JdbcTokenStore(dataSource);
}
@Override
public void configure(AuthorizationServerSecurityConfigurer security) throws Exception {
security
.allowFormAuthenticationForClients();
}
@Override
public void configure(AuthorizationServerEndpointsConfigurer endpoints) throws Exception {
endpoints
.tokenStore(tokenStore())
.authenticationManager(authenticationManager)
.allowedTokenEndpointRequestMethods(HttpMethod.GET, HttpMethod.POST);
}
@Override
public void configure(ClientDetailsServiceConfigurer clients) throws Exception {
clients.jdbc(dataSource)
.passwordEncoder(passwordEncoder);
}
}
|
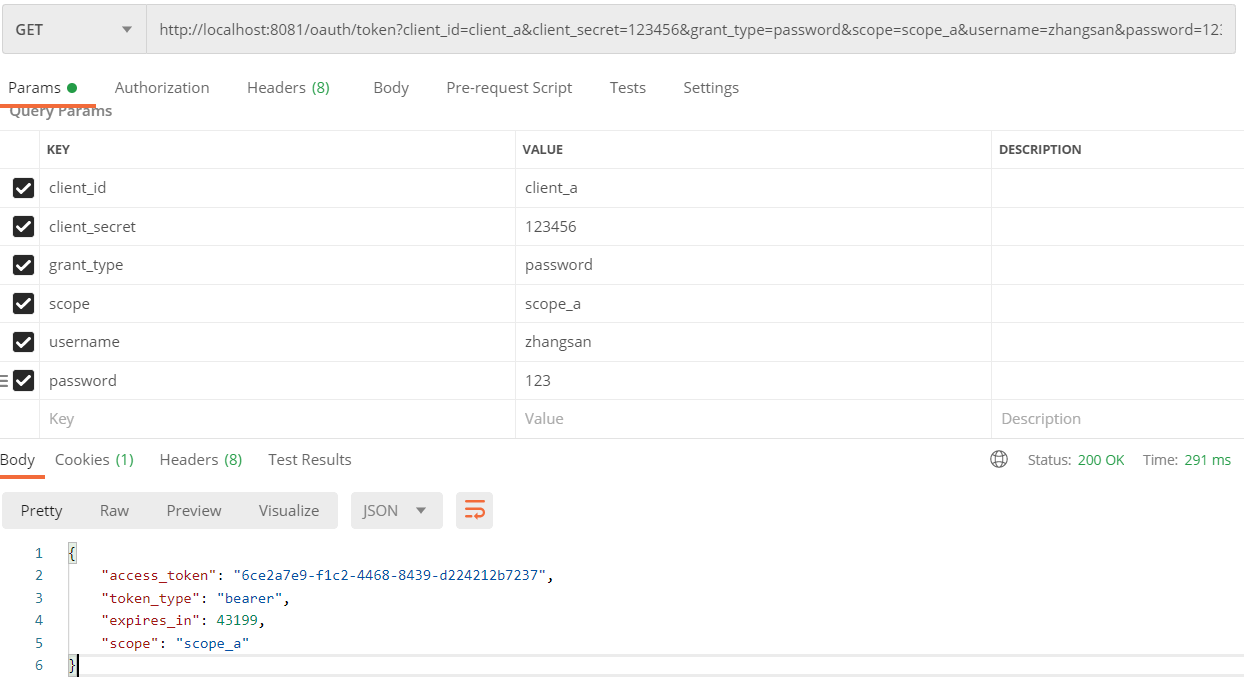
自动服务后,通过/oauth/token接口传入username和password,获取用于访问资源服务器的token。
资源服务器
资源服务器上要做的就是权限的验证,根据调用者所传的token,检查是否能够访问接口。在这里,我们并没有引入jwt这种第三方的token规范,所以如果要验证token,资源服务器也是需要能够访问授权服务器保存token和client_details的相关表,并且还需要引入前面自定义的用户详情类(SysUser.java),否则解析token会报错,为简单起见,这里直接引入authserver模块,pom.xml文件依赖如下。
1
2
3
4
5
6
7
8
9
10
11
12
13
14
15
16
17
18
19
20
21
22
23
24
25
26
27
28
29
30
31
32
33
34
35
36
37
38
| <dependencies>
<dependency>
<groupId>org.springframework.boot</groupId>
<artifactId>spring-boot-starter-web</artifactId>
</dependency>
<dependency>
<groupId>org.springframework.boot</groupId>
<artifactId>spring-boot-starter-security</artifactId>
</dependency>
<dependency>
<groupId>org.springframework.cloud</groupId>
<artifactId>spring-cloud-starter-oauth2</artifactId>
</dependency>
<dependency>
<groupId>mysql</groupId>
<artifactId>mysql-connector-java</artifactId>
</dependency>
<dependency>
<groupId>org.mybatis.spring.boot</groupId>
<artifactId>mybatis-spring-boot-starter</artifactId>
</dependency>
<dependency>
<groupId>com.lzumetal</groupId>
<artifactId>springsecurity-core</artifactId>
<version>1.0-SNAPSHOT</version>
</dependency>
<dependency>
<groupId>com.lzumetal</groupId>
<artifactId>springsecurity-oauth2-authserver</artifactId>
<version>1.0-SNAPSHOT</version>
</dependency>
</dependencies>
|
创建几个测试的接口。
1
2
3
4
5
6
7
8
9
10
11
12
13
14
15
16
17
18
19
20
21
22
| package com.lzumetal.springsecurity.oauth2.resourceserver.controller;
import org.springframework.web.bind.annotation.RequestMapping;
import org.springframework.web.bind.annotation.RestController;
@RestController
public class HelloController {
@RequestMapping("/hello")
public String hello() {
return "hello";
}
@RequestMapping("/admin")
public String admin() {
return "hello admin";
}
}
|
权限控制的配置类。资源服务器有一个重要的注解@EnableResourceServer,另外要继承ResourceServerConfigurerAdapter这个类来做一些权限相关的配置。
1
2
3
4
5
6
7
8
9
10
11
12
13
14
15
16
17
18
19
20
21
22
23
24
25
26
27
28
29
30
31
32
33
34
35
36
37
38
39
40
41
42
43
44
45
46
47
48
49
50
51
52
53
54
55
56
57
58
| package com.lzumetal.springsecurity.oauth2.resourceserver.config;
import org.springframework.beans.factory.annotation.Autowired;
import org.springframework.context.annotation.Bean;
import org.springframework.context.annotation.Configuration;
import org.springframework.security.config.annotation.web.builders.HttpSecurity;
import org.springframework.security.config.http.SessionCreationPolicy;
import org.springframework.security.oauth2.config.annotation.web.configuration.EnableResourceServer;
import org.springframework.security.oauth2.config.annotation.web.configuration.ResourceServerConfigurerAdapter;
import org.springframework.security.oauth2.config.annotation.web.configurers.ResourceServerSecurityConfigurer;
import org.springframework.security.oauth2.provider.token.TokenStore;
import org.springframework.security.oauth2.provider.token.store.JdbcTokenStore;
import javax.sql.DataSource;
@Configuration
@EnableResourceServer
public class OAuth2ResourceServerConfig extends ResourceServerConfigurerAdapter {
@Autowired
private DataSource dataSource;
@Override
public void configure(ResourceServerSecurityConfigurer resources) throws Exception {
resources.resourceId("resource_a");
}
@Override
public void configure(HttpSecurity httpSecurity) throws Exception {
httpSecurity
.csrf().disable()
.sessionManagement().sessionCreationPolicy(SessionCreationPolicy.STATELESS)
.and()
.authorizeRequests()
.antMatchers("/hello").permitAll()
.antMatchers("/admin").hasRole("admin")
.anyRequest().authenticated()
;
}
@Bean
public TokenStore tokenStore() {
return new JdbcTokenStore(dataSource);
}
}
|
用postman测试,有管理员角色的用户可以访问/admin接口,否则会返回access_denied错误。
OAuth2客户端凭证模式demo
授权服务器
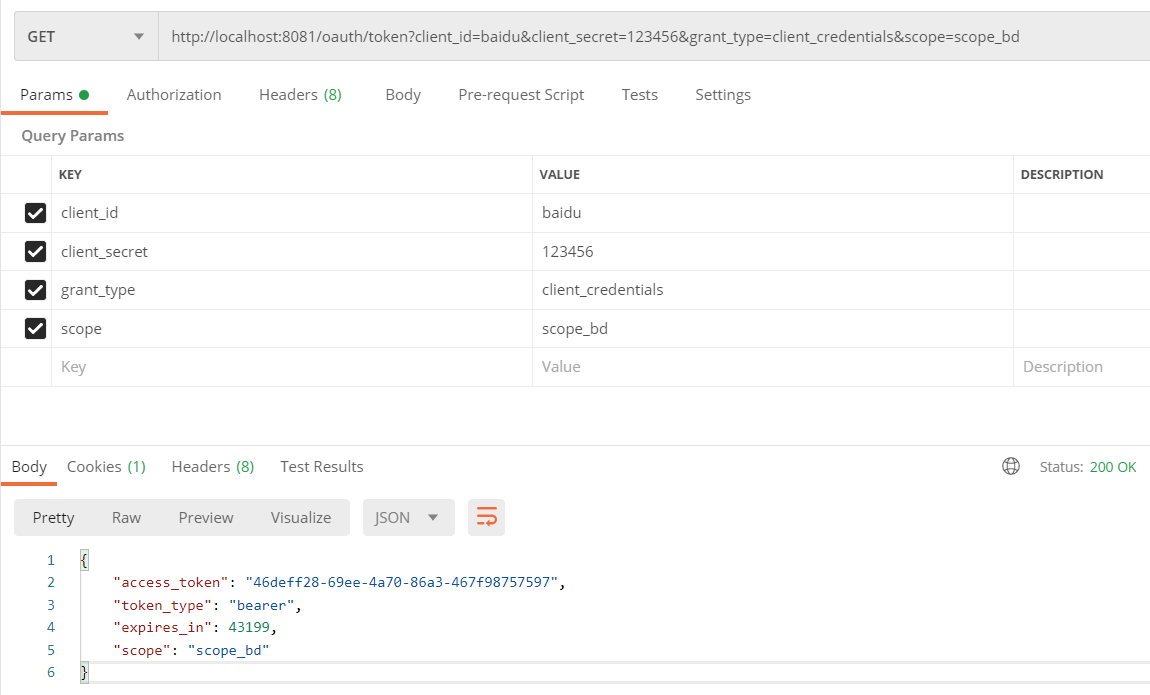
客户端凭证模式的授权服务器代码不需要做修改,为了测试,在oauth_client_details表中加入client_id为 baidu 和 taobao 的两条记录。授权类型(authorized_grant_types)为 client_credentials 。

依然是调用/oauth/token接口,相比密码模式,不需要传username和password参数了。
资源服务器
资源服务器上我们改用scope的方式来做权限验证,这是oauth2特有的一种验证方式,原生的Spring Security中是没有的,再原来OAuth2ResourceServerConfig中的configure方法增加一个配置,然后测试,使用client_id的token,可以正常访问/baidu接口,而scope不为scope_bd的client_id对应的token,则会返回insufficient_scope异常。
1
2
3
4
5
6
7
8
9
10
11
12
13
| @Override
public void configure(HttpSecurity httpSecurity) throws Exception {
httpSecurity
.csrf().disable()
.sessionManagement().sessionCreationPolicy(SessionCreationPolicy.STATELESS)
.and()
.authorizeRequests()
.antMatchers("/hello").permitAll()
.antMatchers("/admin").hasRole("admin")
.antMatchers("/baidu").access("#oauth2.hasScope('scope_bd')")
.anyRequest().authenticated()
;
|