在分布式锁—Redisson分布式锁 一文中简单介绍了Redisson分布式锁,从这节开始分析一下这块的源码,Redisson版本是3.15.6。
首先看一下可重入锁的加锁流程。
加锁入口 Redisson分布式锁加锁的源码主要都是在RedissonLock这个类中,RedissonLock的加锁方法有很多种,有tryLock、lock,也有同步的、异步的,但都会调用到一个tryLockInnerAsync方法,这是本文要分析的一个重点。但首先我们还是从最简单的lock()方法开始分析。
1
2
3
4
5
6
7
8
9
10
11
12
13
14
15
16
17
18
19
20
21
22
23
24
25
26
27
28
29
30
31
32
33
34
35
36
37
38
39
40
41
42
43
44
45
46
47
48
49
50
51
52
53
54
55
56
57
58
59
60
@Override public void lock () { try { lock(-1 , null , false ); } catch (InterruptedException e) { throw new IllegalStateException (); } } private void lock (long leaseTime, TimeUnit unit, boolean interruptibly) throws InterruptedException { long threadId = Thread.currentThread().getId(); Long ttl = tryAcquire(-1 , leaseTime, unit, threadId); if (ttl == null ) { return ; } RFuture <RedissonLockEntry> future = subscribe(threadId); if (interruptibly) { commandExecutor.syncSubscriptionInterrupted(future); } else { commandExecutor.syncSubscription(future); } try { while (true ) { ttl = tryAcquire(-1 , leaseTime, unit, threadId); if (ttl == null ) { break ; } if (ttl >= 0 ) { try { future.getNow().getLatch().tryAcquire(ttl, TimeUnit.MILLISECONDS); } catch (InterruptedException e) { if (interruptibly) { throw e; } future.getNow().getLatch().tryAcquire(ttl, TimeUnit.MILLISECONDS); } } else { if (interruptibly) { future.getNow().getLatch().acquire(); } else { future.getNow().getLatch().acquireUninterruptibly(); } } } } finally { unsubscribe(future, threadId); } }
从源码可以看到,lock()方法本身什么参数也没有。但是在这个方法里,调用私有的lock(long leaseTime, TimeUnit unit, boolean interruptibly)方法时会设置 leaseTime = -1。这个 leaseTime 的含义是加锁的时间 ,-1 表示永久时间,时间的单位由另一个参数unit决定。
接下来看一下lock(long leaseTime, TimeUnit unit, boolean interruptibly)这个方法,在这个方法中,会先调用tryAcquire(leaseTime, unit, threadId)方法,并且传如的threadId参数为当前线程的id,线程id是一个long型正整数。
异步加锁 接下来看一下tryAcquire(leaseTime, unit, threadId)这个方法。这个方法中会掉到tryAcquireOnceAsync这个尝试异步加锁一次的方法。
1
2
3
4
5
6
7
8
9
10
11
12
13
14
15
16
17
18
19
20
21
22
23
24
25
26
27
28
29
30
31
32
private Long tryAcquire (long waitTime, long leaseTime, TimeUnit unit, long threadId) { return get(tryAcquireAsync(waitTime, leaseTime, unit, threadId)); } private RFuture <Boolean> tryAcquireOnceAsync (long waitTime, long leaseTime, TimeUnit unit, long threadId) { RFuture<Boolean> ttlRemainingFuture; if (leaseTime != -1 ) { ttlRemainingFuture = tryLockInnerAsync(waitTime, leaseTime, unit, threadId, RedisCommands.EVAL_NULL_BOOLEAN); } else { ttlRemainingFuture = tryLockInnerAsync(waitTime, internalLockLeaseTime, TimeUnit.MILLISECONDS, threadId, RedisCommands.EVAL_NULL_BOOLEAN); } ttlRemainingFuture.onComplete((ttlRemaining, e) -> { if (e != null ) { return ; } if (ttlRemaining) { if (leaseTime != -1 ) { internalLockLeaseTime = unit.toMillis(leaseTime); } else { scheduleExpirationRenewal(threadId); } } }); return ttlRemainingFuture; }
前面已经说了 leaseTime 是 -1,所以tryAcquireOnceAsync方法中几个参数已经清楚:
waitTime:-1;
internalLockLeaseTime:使用默认时间 30000 毫秒;
TimeUnit.MILLISECONDS:单位毫秒;
threadId:线程 id;
RedisCommands.EVAL_NULL_BOOLEAN:eval 命令。
加锁逻辑 加锁逻辑在tryLockInnerAsync这个方法里。
1
2
3
4
5
6
7
8
9
10
11
12
13
14
15
<T> RFuture <T> tryLockInnerAsync (long waitTime, long leaseTime, TimeUnit unit, long threadId, RedisStrictCommand<T> command) { return evalWriteAsync(getRawName(), LongCodec.INSTANCE, command, "if (redis.call('exists', KEYS[1]) == 0) then " + "redis.call('hincrby', KEYS[1], ARGV[2], 1); " + "redis.call('pexpire', KEYS[1], ARGV[1]); " + "return nil; " + "end; " + "if (redis.call('hexists', KEYS[1], ARGV[2]) == 1) then " + "redis.call('hincrby', KEYS[1], ARGV[2], 1); " + "redis.call('pexpire', KEYS[1], ARGV[1]); " + "return nil; " + "end; " + "return redis.call('pttl', KEYS[1]);" , Collections.singletonList(getRawName()), unit.toMillis(leaseTime), getLockName(threadId)); }
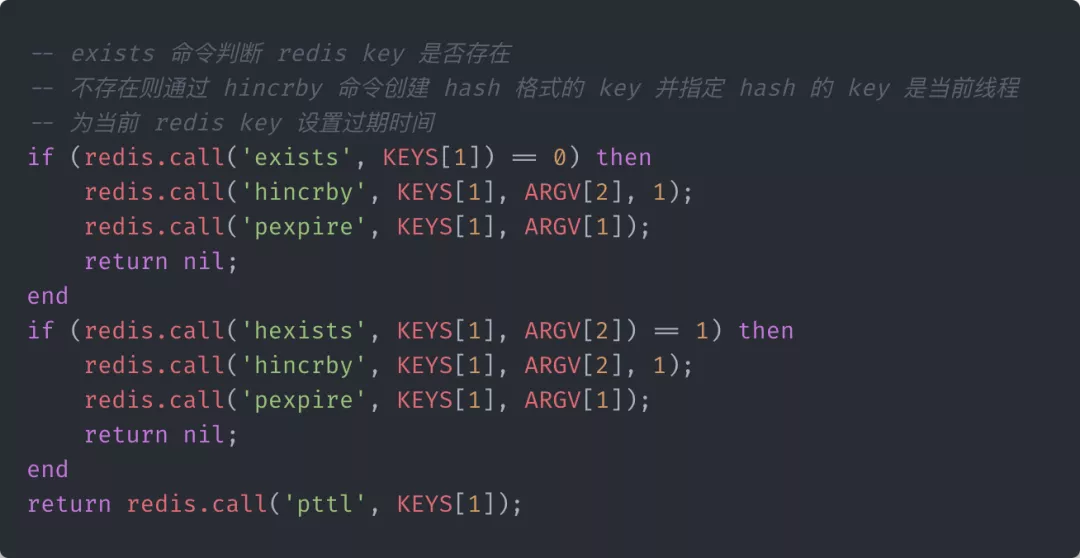
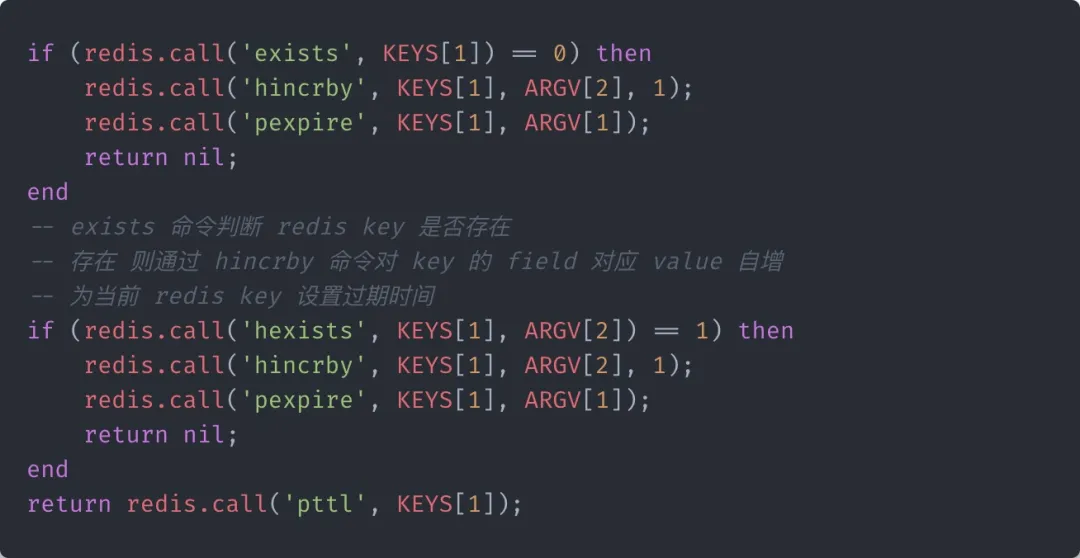
可以看到,真正的加锁,其实就是执行这么一段 lua 脚本。使用 lua 脚本是为了保证整个执行过程的原子性。
先说明一下 lua 脚本的参数信息:
KEYS[1]:getRawName(),加锁的 key ,也即是加锁时设置在redis的 hash 表中的 key,比如 anyLock;
ARGV[1]:unit.toMillis(leaseTime),锁的毫秒时间,比如 30000;
ARGV[2]:getLockName(threadId),锁的名称。是 UUID 和线程 id 拼接起来的字符串,比如 931573de-903e-42fd-baa7-428ebb7eda80:1。
首次加锁分析:
exists 命令判断 redis 中名称为 anyLock 的 key 是否存在;
不存在,使用 hincrby 命令,创建 anyLock key 对应的数据;
对 anyLock 设置过期时间。
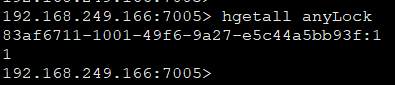
加锁后可以查看redis中的数据(使用了redis的hash数据结构):
可以简单理解为 anyLock 下面挂着一个 K-V 结构的数据:
1
2
3
"anyLock" : { "83af6711-1001-49f6-9a27-e5c44a5bb93f:1" : "1" }
执行脚本 上面已经确定了 lua 脚本的语句和参数,下一步就行执行了,需要注意的地方就是有个哈希槽路由。
1
2
3
4
5
6
7
8
9
10
11
12
13
14
15
16
17
18
19
protected <T> RFuture <T> evalWriteAsync (String key, Codec codec, RedisCommand<T> evalCommandType, String script, List<Object> keys, Object... params) { CommandBatchService executorService = createCommandBatchService(); RFuture <T> result = executorService.evalWriteAsync(key, codec, evalCommandType, script, keys, params); if (commandExecutor instanceof CommandBatchService) { return result; } RPromise <T> r = new RedissonPromise <>(); RFuture <BatchResult<?>> future = executorService.executeAsync(); future.onComplete((res, ex) -> { if (ex != null ) { r.tryFailure(ex); return ; } r.trySuccess(result.getNow()); }); return r; }
CommandBatchService类中的evalWriteAsync方法和evalAsync方法,这两个方法都是在CommandBatchService的父类CommandAsyncService类中。
CommandAsyncService中的两个方法:
1
2
3
4
5
6
7
8
9
10
11
12
13
14
15
16
17
18
19
20
21
22
23
24
25
26
27
28
29
30
31
32
33
34
35
36
37
38
39
40
41
42
43
44
45
46
47
48
49
50
51
52
53
54
55
56
57
58
59
60
61
62
63
64
65
66
67
68
69
70
71
72
73
@Override public <T, R> RFuture <R> evalWriteAsync (String key, Codec codec, RedisCommand<T> evalCommandType, String script, List<Object> keys, Object... params) { NodeSource source = getNodeSource(key); return evalAsync(source, false , codec, evalCommandType, script, keys, params); } private <T, R> RFuture <R> evalAsync (NodeSource nodeSource, boolean readOnlyMode, Codec codec, RedisCommand<T> evalCommandType, String script, List<Object> keys, Object... params) { if (isEvalCacheActive() && evalCommandType.getName().equals("EVAL" )) { RPromise <R> mainPromise = new RedissonPromise <R>(); Object [] pps = copy(params); RPromise <R> promise = new RedissonPromise <R>(); String sha1 = calcSHA(script); RedisCommand cmd = new RedisCommand (evalCommandType, "EVALSHA" ); List <Object> args = new ArrayList <Object>(2 + keys.size() + params.length); args.add(sha1); args.add(keys.size()); args.addAll(keys); args.addAll(Arrays.asList(params)); RedisExecutor <T, R> executor = new RedisExecutor <>(readOnlyMode, nodeSource, codec, cmd, args.toArray(), promise, false , connectionManager, objectBuilder, referenceType); executor.execute(); promise.onComplete((res, e) -> { if (e != null ) { if (e.getMessage().startsWith("NOSCRIPT" )) { RFuture <String> loadFuture = loadScript(executor.getRedisClient(), script); loadFuture.onComplete((r, ex) -> { if (ex != null ) { free(pps); mainPromise.tryFailure(ex); return ; } RedisCommand command = new RedisCommand (evalCommandType, "EVALSHA" ); List <Object> newargs = new ArrayList <Object>(2 + keys.size() + params.length); newargs.add(sha1); newargs.add(keys.size()); newargs.addAll(keys); newargs.addAll(Arrays.asList(pps)); NodeSource ns = nodeSource; if (ns.getRedisClient() == null ) { ns = new NodeSource (nodeSource, executor.getRedisClient()); } async(readOnlyMode, ns, codec, command, newargs.toArray(), mainPromise, false ); }); } else { free(pps); mainPromise.tryFailure(e); } return ; } free(pps); mainPromise.trySuccess(res); }); return mainPromise; } RPromise <R> mainPromise = createPromise(); List <Object> args = new ArrayList <Object>(2 + keys.size() + params.length); args.add(script); args.add(keys.size()); args.addAll(keys); args.addAll(Arrays.asList(params)); async(readOnlyMode, nodeSource, codec, evalCommandType, args.toArray(), mainPromise, false ); return mainPromise; }
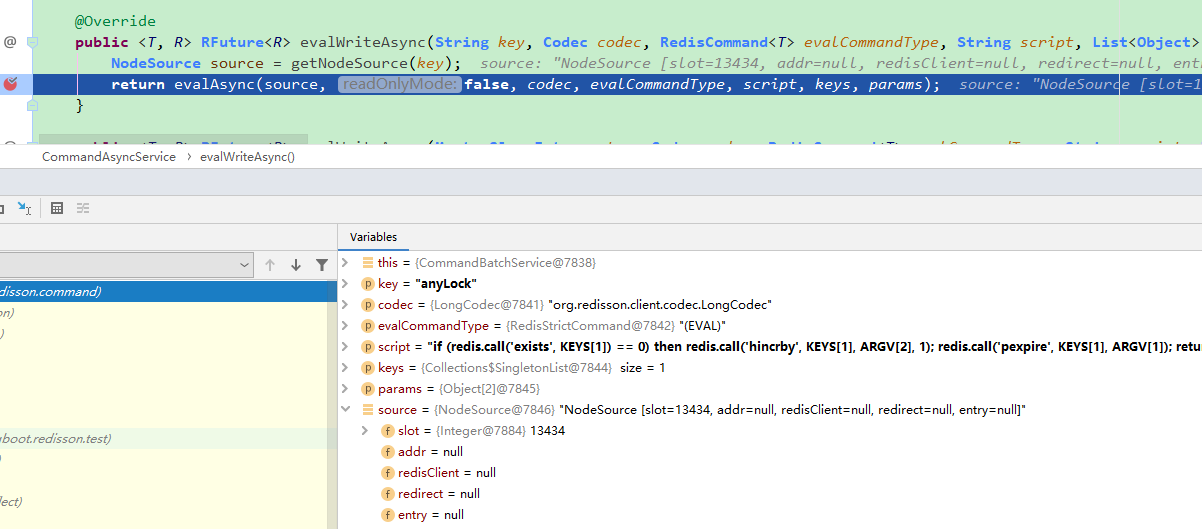
evalWriteAsync方法中会先获取一个 NodeSource。通过debug可以看到 NodeSource 的值。
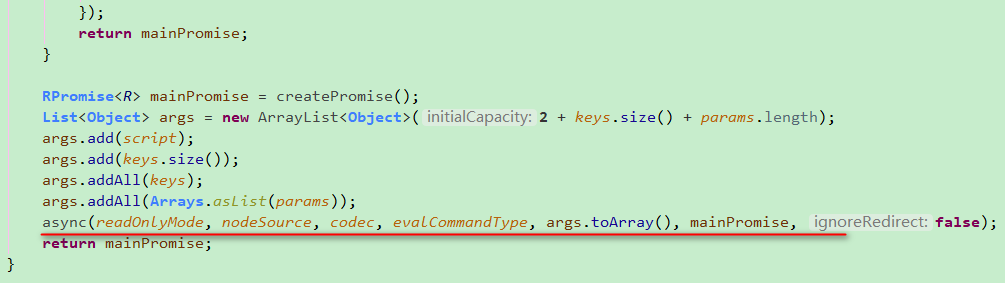
接下来会调用evalAsync方法,然后调用到async这个方法。
async方法在CommandBatchService类中是有重写的。
1
2
3
4
5
6
7
8
9
10
11
12
13
14
15
16
@Override public <V, R> void async (boolean readOnlyMode, NodeSource nodeSource, Codec codec, RedisCommand<V> command, Object[] params, RPromise<R> mainPromise, boolean ignoreRedirect) { if (isRedisBasedQueue()) { boolean isReadOnly = options.getExecutionMode() == ExecutionMode.REDIS_READ_ATOMIC; RedisExecutor <V, R> executor = new RedisQueuedBatchExecutor <>(isReadOnly, nodeSource, codec, command, params, mainPromise, false , connectionManager, objectBuilder, commands, connections, options, index, executed, latch, referenceType); executor.execute(); } else { RedisExecutor <V, R> executor = new RedisBatchExecutor <>(readOnlyMode, nodeSource, codec, command, params, mainPromise, false , connectionManager, objectBuilder, commands, options, index, executed, referenceType); executor.execute(); } }
再这个方法中,下一步会进入的else代码块,创建一个RedisBatchExecutor实例,并执行RedisBatchExecutor的execute()方法,其中前面的那个 NodeSource 对象作为构造器的参数传入。RedisBatchExecutor重写的execute()方法,这个方法很简单,只是调用了其父类中的addBatchCommandData方法。
1
2
3
4
@Override public void execute () { addBatchCommandData(params); }
最后来看一下addBatchCommandData方法。
1
2
3
4
5
6
7
8
9
10
11
12
13
14
15
16
17
18
19
20
21
22
23
24
25
26
27
28
29
30
31
protected final MasterSlaveEntry getEntry (NodeSource source) { if (source.getSlot() != null ) { MasterSlaveEntry entry = connectionManager.getEntry(source.getSlot()); if (entry == null ) { throw connectionManager.createNodeNotFoundException(source); } return entry; } return source.getEntry(); } protected final void addBatchCommandData (Object[] batchParams) { MasterSlaveEntry msEntry = getEntry(source); Entry entry = commands.get(msEntry); if (entry == null ) { entry = new Entry (); Entry oldEntry = commands.putIfAbsent(msEntry, entry); if (oldEntry != null ) { entry = oldEntry; } } if (!readOnlyMode) { entry.setReadOnlyMode(false ); } Codec codecToUse = getCodec(codec); BatchCommandData <V, R> commandData = new BatchCommandData <V, R>(mainPromise, codecToUse, command, batchParams, index.incrementAndGet()); entry.getCommands().add(commandData); }
在addBatchCommandData方法中,会从 source 里面获取到 solt,然后获得 MasterSlaveEntry。MasterSlaveEntry 可以理解为单个redis节点的连接配置对象。
可重入 既然是可重入锁,这块是支持可重入的,接下来看下可重入是如何做的。
重入的流程是:
exists 命令判断 redis 中 key 对应的哈希数据结构中 field 键是否存在;
存在 则通过 hincrby 命令对 key 的 field 对应 value 自增;
为当前 redis key 设置过期时间。
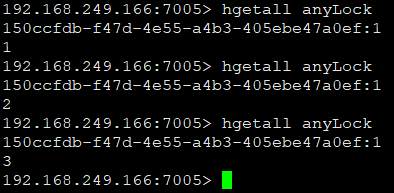
比如我调用3次lock方法,查看 redis 中的数据如下:
加锁互斥 上面已经验证了两种情况:
redis key 不存在;
redis key 和 key 的 field 存在。
剩下的情况就是 key 存在但 field 不存在。
因为 key 的 field 放的 value 是 UUID:ThreadId,说明加锁的不是当前线程。Redisson对这种情况的做法是直接返回当前锁的剩余时间。
总结 本文主要介绍了 Redisson 可重入锁的加锁、锁重入、锁互斥逻辑。
核心重点在 lua 脚本。同时需要理解 Redis 的 Hash 数据结构。
同时需要记住,在未指定加锁时间时,默认使用的是 30s。
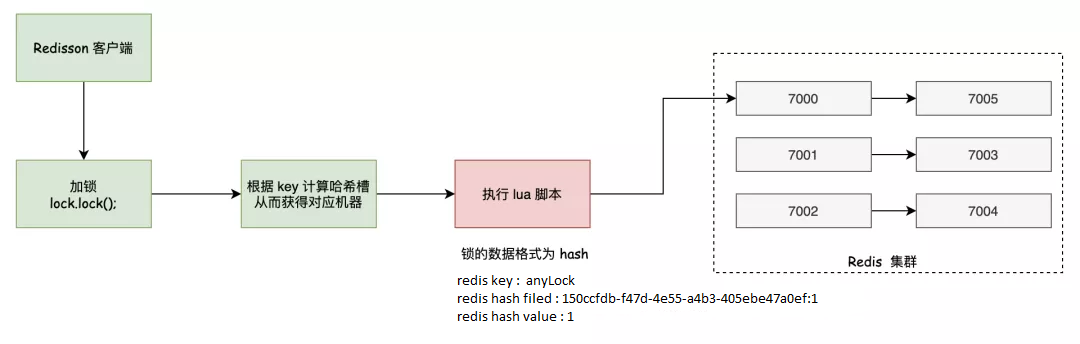
最后,一张图介绍本文加锁逻辑。