在前面一篇文章中,我们已经启动了一个Elasticsearch的服务,那么怎么使用它来存储和搜索数据呢?
客户端可以通过两个端口和Elasticsearch交互,一个是9200(HTTP),另一个是9300(TCP),既然可以通过http方式通信,那么这就很简单了,直接使用Linux上curl命令调用ES的Restful API就可完成交互了。curl命令的格式:1
curl -X<VERB> '<PROTOCOL>://<HOST>:<PORT>/<PATH>?<QUERY_STRING>' -d '<BODY>'
| < > | 描述 |
|---|---|
| VERB | 适当的 HTTP 方法 或 谓词 : GET、 POST、 PUT、 HEAD 或者 DELETE |
| PROTOCOL | http 或者 https(如果你在 Elasticsearch 前面有一个https 代理) |
| HOST | Elasticsearch 集群中任意节点的主机名,或者用 localhost 代表本地机器上的节点 |
| PORT | 运行 Elasticsearch HTTP 服务的端口号,默认是 9200 |
| PATH | API 的终端路径(例如 _count 将返回集群中文档数量)。Path 可能包含多个组件,例如:_cluster/stats 和 _nodes/stats/jvm |
| QUERY_STRING | 任意可选的查询字符串参数 (例如 ?pretty 将格式化地输出 JSON 返回值,使其更容易阅读) |
| BODY | 一个 JSON 格式的请求体 (如果请求需要的话) |
常用的Restful API
1.查看集群的健康状况
1 | curl -XGET 'http://localhost:9200/_cat/health?v' |
其中,v是用来要求在结果中返回表头。
响应结果:1
2epoch timestamp cluster status node.total node.data shards pri relo init unassign pending_tasks max_task_wait_time active_shards_percent
1616940897 14:14:57 elasticsearch green 1 1 0 0 0 0 0 0 - 100.0%
返回结果的主要字段意义:
- cluster:集群名,是在ES的配置文件中配置的cluster.name的值。
- status:集群状态。集群共有green、yellow或red中的三种状态。green代表一切正常(集群功能齐全),yellow意味着所有的数据都是可用的,但是某些复制没有被分配(集群功能齐全),red则代表因为某些原因,某些数据不可用。如果是red状态,则要引起高度注意,数据很有可能已经丢失。
- node.total:集群中的节点数。
- node.data:集群中的数据节点数。
- shards:集群中总的分片数量。
- pri:主分片数量,英文全称为private。
- relo:复制分片总数。
- unassign:未指定的分片数量,是应有分片数和现有的分片数的差值(包括主分片和复制分片)。
可以看到我们的名称为“elasticsearch”的集群正在运行,状态标识为green,集群总共包含1个节点,由于当前ES里面没有数据时,总共有1个节点,0个分片。
2.查看集群的所有节点
1 | curl -XGET 'http://localhost:9200/_cat/nodes?v' |
响应结果:1
2ip heap.percent ram.percent cpu load_1m load_5m load_15m node.role master name
127.0.0.1 14 93 1 0.00 0.01 0.05 mdi * iQ0-NOB
这里,我们可以看到我们的一个节点名称叫做“iQ0-NOB”,它是目前我们集群中的唯一的节点。
3. 查看所有索引
1 | curl -XGET 'http://localhost:9200/_cat/indices?v' |
返回结果为:1
health status index uuid pri rep docs.count docs.deleted store.size pri.store.size
这个返回结果只是一个表头,这表示我们的集群中还没有任何索引。
4.创建索引
现在让我们创建一个索引,名称为“customer”,然后再一次列出所有的索引:1
2curl -XPUT "http://localhost:9200/customer?pretty"
curl -XGET 'http://localhost:9200/_cat/indices?v'
第一个命令使用PUT方法创建了一个名为“customer”的索引。我们简单的在请求后面追加pretty参数来使返回值以格式化过的JSON输出(如果返回值是JSON格式的话)。
然后它的返回结果为:1
2
3
4
5
6
7
8
9
10
11第一个命令的返回结果:
{
"acknowledged": true,
"index": "customer",
"shards_acknowledged": true
}
第二个命令的返回结果:
health status index uuid pri rep docs.count docs.deleted store.size pri.store.size
yellow open customer HCNH8siVSQ2fIq4Jviu8fg 5 1 0 0 1.1kb 1.1kb
第二个命令的返回结果告诉我们,我们现在有1个名称为“customer”的索引,并且有5个主分片和1个拷贝(默认情况),并且里面包含0个文档。
我们注意到,这个customer索引的健康状态是yellow,根据前面的说明,yellow的意思是有一些拷贝还没有被分配。原因是Elasticsearch默认为当前索引创建一个拷贝,但是当前我们只启动了一个节点,这个拷贝直到一段时间后有另一个节点加入集群之前,不会被分配(为了高可用,拷贝不会与索引分配到同一个节点上)。一旦拷贝在第二个节点上获得分配,这个索引的健康状态就会变成green。
5.新增文档
现在让我们往customer索引中存放点东西。如下请求将一个简单的顾客文档放入customer索引中,并指定id为1:1
2
3
4
5curl -XPUT -H 'Content-Type: application/json' 'http://localhost:9200/customer/doc/1?pretty' -d '
{
"name": "John Doe"
}
'
响应结果为:1
2
3
4
5
6
7
8
9
10
11
12
13
14{
"_index" : "customer",
"_type" : "doc",
"_id" : "1",
"_version" : 1,
"result" : "created",
"_shards" : {
"total" : 2,
"successful" : 1,
"failed" : 0
},
"_seq_no" : 0,
"_primary_term" : 1
}
从上面可以看到,一个新的顾客文档已经在customer索引中成功创建,并且这个文档的id=1。
注意:
- 你不需要在将一个文档加入一个索引前明确的将这个索引预先创建好。在上面我们创建文档的例子中,如果这个customer索引事先不存在,Elasticsearch会自动创建customer索引。
- 新增文档时id并不是必须的。如果没有指定id,Elasticsearch将会生产一个随机的id,然后使用它去索引文档。并且实际Elasticsearch生成的ID(或者是我们明确指定的)将会在API调用成功后返回。
当我们没有明确指定id的时候,我们需要使用POST方法代替PUT来发送请求。1
2
3
4curl -XPOST -H 'Content-Type: application/json' 'http://localhost:9200/customer/doc?pretty' -d
'{
"name": "Simmon"
}'
6.通过id获取文档
接下来我们通过id来获取刚刚加入索引的文档:1
curl -XGET 'http://localhost:9200/customer/doc/1?pretty'
返回结果为:1
2
3
4
5
6
7
8
9
10
11
12{
"_index" : "customer",
"_type" : "doc",
"_id" : "1",
"_version" : 1,
"_seq_no" : 0,
"_primary_term" : 1,
"found" : true,
"_source" : {
"name" : "John Doe"
}
}
响应结果里的found属性表示查询到了一个id=1的文档,_source属性返回我们在上一步中加入索引的完整JSON文档内容。
7.删除索引
现在让我们删除刚刚创建的索引并且再次列出所有的索引:1
2curl -XDELETE 'http://localhost:9200/customer?pretty'
curl -XGET 'http://localhost:9200/_cat/indices?v'
第一个命令的返回结果为:1
2
3{
"acknowledged" : true
}
第二个命令的返回结果为:1
health status index uuid pri rep docs.count docs.deleted store.size pri.store.size
以上结果索引索引已经被删除,回到了刚开始集群中什么都没有的状态。
8.替换文档
前面已经介绍了如何新增文档,调用新增文档的Restful API两次(两次调用的id相同),则后面新增的文档将会覆盖第一次提交的。
1 | curl -XPUT -H 'Content-Type: application/json' 'http://localhost:9200/customer/doc/1?pretty' -d ' |
id为1的文档的name属性从“John Doe”改成了“Simon”。设想另一种场景,我们使用一个不同的id,这样的话将会创建一个新的文档,而之前的文档还是保持原样。
9.更新文档
除了能够新增和替换文档,我们也可以更新文档。注意:Elasticsearch在底层并没有真正更新文档,而是当我们更新文档时,Elasticsearch首先去删除旧的文档,然后加入新的文档。
如下的例子演示如何去更新我们的之前id为1的文档,在这里将name属性改为“James”:1
2
3
4
5curl -XPOST -H 'Content-Type: application/json' 'http://localhost:9200/customer/doc/1/_update?pretty' -d '
{
"doc": { "name": "James" }
}
'
如下示例演示如何更新我们之前ID为1的文档,修改name属性为“James”,并同时添加新的age属性:1
2
3
4
5curl -XPOST -H 'Content-Type: application/json' 'http://localhost:9200/customer/doc/1/_update?pretty' -d '
{
"doc": { "name": "James" , "age": 20}
}
'
10.删除文档
1 | curl -XDELETE 'http://localhost:9200/customer/doc/1?pretty' |
返回结果为:1
2
3
4
5
6
7
8
9
10
11
12
13
14{
"_index" : "customer",
"_type" : "doc",
"_id" : "1",
"_version" : 4,
"result" : "deleted",
"_shards" : {
"total" : 2,
"successful" : 1,
"failed" : 0
},
"_seq_no" : 3,
"_primary_term" : 1
}
注意:这里的1必须是索引中已经存在id。删除成功后再查询,返回的found属性为false。
再次执行:1
curl -XGET 'http://localhost:9200/customer/doc/1?pretty'
响应结果:1
2
3
4
5
6{
"_index" : "customer",
"_type" : "doc",
"_id" : "1",
"found" : false
}
11.搜索文档
准备数据
在演示之前,我们先准备好一些虚拟的顾客银行账户信息JSON文档样本。每一个文档都有如下的机构:1
2
3
4
5
6
7
8
9
10
11
12
13{
"account_number": 0,
"balance": 16623,
"firstname": "Bradshaw",
"lastname": "Mckenzie",
"age": 29,
"gender": "F",
"address": "244 Columbus Place",
"employer": "Euron",
"email": "bradshawmckenzie@euron.com",
"city": "Hobucken",
"state": "CO"
}
文档样本地址:https://raw.githubusercontent.com/elastic/elasticsearch/master/docs/src/test/resources/accounts.json 。把这些数据保存到一个文档中(比如命名为accounts.json),把文档上传到服务器当前的目录下,然后使用如下的命令把它加载到es中:1
curl -H "Content-Type: application/json" -XPOST 'http://localhost:9200/bank/account/_bulk?pretty&refresh' --data-binary "@accounts.json"
重新查看es库的所有索引,得到结果为:1
2
3health status index uuid pri rep docs.count docs.deleted store.size pri.store.size
yellow open bank yTNDcd3wQbeMNjLkpe7byQ 5 1 1000 0 482.5kb 482.5kb
yellow open customer dYUIllbCSH-e08tkY0m-9Q 5 1 0 0 1.2kb 1.2kb
可以看到,我们已经向bank这个index中插入了1000条记录。
搜索API
搜索可以说是Elasticsearch中最重要的功能,也是使用起来比较复杂的Restful API,执行搜索有两种基础的方式,一种是在请求的URL中加入参数来实现,被称为query string search,比如通过curl命令请求GET /bank/_search?q=age:30&sort=balance:desc。另一种方式是将请求内容放到请求体中,使用请求体可以让你的JSON数据以一种更加可读和更加富有展现力的方式发送,生产环境通常也是用这种方式,在本文中都使用请求体的方式来演示。
下面从简单的搜索指令开始演示。1
2
3
4
5
6
7
8curl -XGET -H 'Content-Type: application/json' 'http://localhost:9200/bank/_search?pretty' -d '
{
"query": { "match_all": {} },
"sort": [
{ "account_number": "asc" }
]
}
'
首先我们分析一下这个搜索请求。这个请求在bank索引中进行搜索(使用 _search 端点),json格式中的"query": { "match_all": {} }表示匹配索引中的全部文档,"sort": [{ "account_number": "asc" }]表示按 account_number 属性升序排列返回的结果。
返回结果为(仅展示部分):1
2
3
4
5
6
7
8
9
10
11
12
13
14
15
16
17
18
19
20
21
22
23
24
25
26
27
28
29
30
31
32
33
34
35
36
37
38
39
40
41
42{
"took" : 218,
"timed_out" : false,
"_shards" : {
"total" : 5,
"successful" : 5,
"skipped" : 0,
"failed" : 0
},
"hits" : {
"total" : 1000,
"max_score" : null,
"hits" : [
{
"_index" : "bank",
"_type" : "account",
"_id" : "0",
"_score" : null,
"_source" : {
"account_number" : 0,
"balance" : 16623,
"firstname" : "Bradshaw",
"lastname" : "Mckenzie",
"age" : 29,
"gender" : "F",
"address" : "244 Columbus Place",
"employer" : "Euron",
"email" : "bradshawmckenzie@euron.com",
"city" : "Hobucken",
"state" : "CO"
},
"sort" : [
0
]
},
{
//省略
}
]
}
}
返回结果的部分字段说明:
- took - Elasticsearch执行此次搜索所用的时间(单位:毫秒)
- timed_out - 告诉我们此次搜索是否超时
- _shards - 告诉我们搜索了多少分片,还有搜索成功和搜索失败的分片数量
- hits - 搜索结果
- hits.total - 符合搜索条件的文档数量
- hits.hits - 实际返回的搜索结果对象数组(默认只返回前10条)
- hits.sort - 返回结果的排序字段值(如果是按score进行排序,则没有)
- hits._score 和 max_score - 这两个字段和全文检索有关,就是一个document对于一个search的相关度的匹配分数、最大分数。匹配度越高分数越高。
一旦你得到了返回结果,Elasticsearch就完全执行结束,不会保持任何的服务器资源或者往你的结果里加入开放的游标,理解这一点是非常重要的。这同很多其他的平台比如SQL数据库的一些特性形成了鲜明的对比,比如在SQL数据库中你可能在查询时,会首先得到查询结果的一部分,然后你需要通过一些有状态的服务端游标不断地去请求服务端来取得剩余的查询结果。
查询语言介绍
Elasticsearch提供了一种JSON格式的领域特定语言,你可以使用它来执行查询。这个通常叫做Query DSL。
回到上面的例子,我们执行了这个查询:1
2
3
4
5
6
7
8curl -XGET -H 'Content-Type: application/json' 'http://localhost:9200/bank/_search?pretty' -d '
{
"query": { "match_all": {} },
"sort": [
{ "account_number": "asc" }
]
}
'
分析以上查询,query 部分告诉我们我们的查询定义是什么,match_all 部分简单指定了我们想去执行的查询类型,意思就是在索引中搜索所有的文档。
除了query参数,我们还可以通过其他的参数影响搜索结果。在上一节的示例中我们使用了sort来指定搜索结果的顺序,这里我们指定size来指定返回的结果数量:1
2
3
4
5
6curl -XGET -H 'Content-Type: application/json' 'http://localhost:9200/bank/_search?pretty' -d '
{
"query": { "match_all": {} },
"size": 1
}
'
注意:如果size没有指定,它默认为10。
如下的示例使用match_all并返回了11到20的文档:1
2
3
4
5
6
7curl -XGET -H 'Content-Type: application/json' 'http://localhost:9200/bank/_search?pretty' -d '
{
"query": { "match_all": {} },
"from": 10,
"size": 10
}
'
from 参数(从0开始)指定了从哪个文档索引开始,size 参数指定了从from指定的索引开始返回多少个文档。这个特性在实现分页搜索时很有用。注意如果from参数没有指定,它默认为0。
如下示例使用match_all并且按账户的balance值进行倒序排列后返回前10条文档:1
2
3
4
5
6curl -XGET -H 'Content-Type: application/json' 'http://localhost:9200/bank/_search?pretty' -d '
{
"query": { "match_all": {} },
"sort": { "balance": { "order": "desc" } }
}
'
搜索(query)
1.match查询
前面的示例中使用了match_all来匹配所有的文档。现在让我们介绍一下match查询,它可以被认为是基本的属性搜索查询(就是通过特定的一个或多个属性来搜索)。
如下的示例返回account_number为20的文档:1
2
3
4
5curl -XGET -H 'Content-Type: application/json' 'http://localhost:9200/bank/_search?pretty' -d '
{
"query": { "match": { "account_number": 20 } }
}
'
除了match_all,还有match、match_phrase、match_phrase_prefix等匹配方式。在kibana的开发工具里面就能看到自动提示: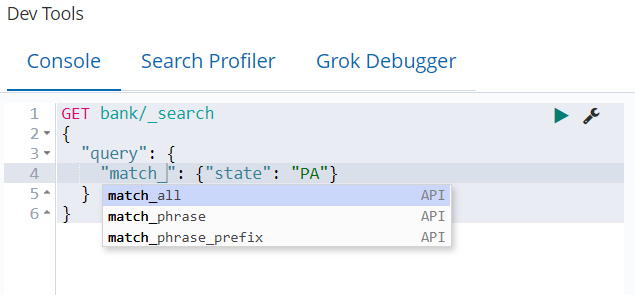
match_all因为是搜索全部文档,所以后面是加一个空的查询条件(空json:{});match是匹配搜索,比如搜索"match": { "title": "中国" }就会根据分词结果,进行title这个字段的全文检索,结果是会把title中含有‘中’、‘国’、‘中国’的docment都匹配出来;match_phrase是短语查询,和match相比,它不会考虑分词,只会搜索出title中含有‘中国’的document;match_phrase_prefix是最左前缀查询,比如我要查询title中含有‘beautiful’的document,但‘beautiful’这个单词忘了怎么拼了,那就可以使用"match": { "match_phrase_prefix": "bea" }来查询,当然这样查询的结果就是可能把title中含有‘beach’这样的记录也会查出来的。
2.bool 查询
bool 查询允许我们使用布尔逻辑将小的查询组成大的查询。
如下的示例组合两个match查询并且返回所有address属性中包含 “mill” 和 “lane” 的账户文档:1
2
3
4
5
6
7
8
9
10
11
12curl -XGET -H 'Content-Type: application/json' 'http://localhost:9200/bank/_search?pretty' -d '
{
"query": {
"bool": {
"must": [
{ "match": { "address": "mill" } },
{ "match": { "address": "lane" } }
]
}
}
}
'
在上述示例中,bool must 子句指定了所有匹配文档必须满足的条件。
相比之下,如下的示例组合两个match查询并且返回所有address属性中包含 “mill” 或 “lane” 的账户文档:1
2
3
4
5
6
7
8
9
10
11
12curl -XGET -H 'Content-Type: application/json' 'http://localhost:9200/bank/_search?pretty' -d '
{
"query": {
"bool": {
"should": [
{ "match": { "address": "mill" } },
{ "match": { "address": "lane" } }
]
}
}
}
'
在上述的例子中,bool should 子句指定了匹配文档只要满足其中的任何一个条件即可匹配。
如下示例组合两个match查询并且返回所有address属性中既不包含 “mill” 也不包含 “lane” 的账户文档:1
2
3
4
5
6
7
8
9
10
11
12curl -XGET -H 'Content-Type: application/json' 'http://localhost:9200/bank/_search?pretty' -d '
{
"query": {
"bool": {
"must_not": [
{ "match": { "address": "mill" } },
{ "match": { "address": "lane" } }
]
}
}
}
'
在上述例子中,bool must_not 子句指定了其中的任何一个条件都不满足时即可匹配。
我们可以在一个bool查询中同时指定must,should和must_not子句。此外,我们也可以在一个bool子句中组合另一个bool来模拟任何复杂的多重布尔逻辑。
如下的示例返回所有age属性为40,并且state属性不为ID的账户文档:1
2
3
4
5
6
7
8
9
10
11
12
13
14curl -XGET -H 'Content-Type: application/json' 'http://localhost:9200/bank/_search?pretty' -d '
{
"query": {
"bool": {
"must": [
{ "match": { "age": "40" } }
],
"must_not": [
{ "match": { "state": "ID" } }
]
}
}
}
'
3.range 查询
Elasticsearch的bool 查询也支持 filter 子句,它允许我们可以在不改变得分计算逻辑的的情况下限制其他子句匹配的查询结果。为了示例说明,让我们介绍一下range 查询,它允许我们通过一个值区间来过滤文档。这个通常用在数值和日期过滤上。
如下的示例使用bool查询返回所有余额在20000到30000之间的账户(包含边界)。换句话说,我们想查询账户余额大于等于20000并且小于等于30000的用户。1
2
3
4
5
6
7
8
9
10
11
12
13
14
15
16
17curl -XGET -H 'Content-Type: application/json' 'http://localhost:9200/bank/_search?pretty' -d '
{
"query": {
"bool": {
"must": { "match_all": {} },
"filter": {
"range": {
"balance": {
"gte": 20000,
"lte": 30000
}
}
}
}
}
}
'
仔细分析一下上面的例子,bool查询在查询部分使用match_all,在过滤部分使用range。我们可以使用任何的查询来代替查询部分和过滤部分。在上面的例子中,range查询让结果更加合乎情理,因为文档在这个区间中一定是符合的,就是说,没有比这些相关性更大的了。
除了match,bool,和range查询之外,还有很多其他的查询类型,在这里我们就不一一介绍了。当我们对这些基础的理解了之后,再去学习和使用其他的查询类型应该是不会太难了。
4. 聚合查询
聚合提供了功能可以分组并统计你的数据。理解聚合最简单的方式就是可以把它粗略的看做SQL的GROUP BY操作和SQL的聚合函数。在Elasticsearch中,你可以在执行搜索后在一个返回结果中同时返回搜索结果和聚合结果。你可以使用简洁的API执行搜索和多个聚合操作,并且可以一次拿到所有的结果,避免网络切换,就此而言,这是一个非常强大和高效功能。
作为开始,如下的例子将账户按state进行分组,然后按count降序(默认)返回前10组(默认)states。1
2
3
4
5
6
7
8
9
10
11
12curl -XGET -H 'Content-Type: application/json' 'http://localhost:9200/bank/_search?pretty' -d '
{
"size": 0,
"aggs": {
"group_by_state": {
"terms": {
"field": "state.keyword"
}
}
}
}
'
在上面的这个查询语句中,aggs表示这是一个聚合查询,group_by_state是我们对这个聚合查询起的一个名称(用户可以自定义这个名称),terms表示这个聚合下做terms操作,terms操作表示对指定的field进行分组并统计每个分组里面docment的数量。
返回结果为(仅展示部分):1
2
3
4
5
6
7
8
9
10
11
12
13
14
15
16
17
18
19
20
21
22
23
24
25
26
27
28
29
30
31
32
33
34
35
36
37
38
39
40
41
42
43
44
45
46
47
48
49
50
51
52
53
{
  "took": 29,
  "timed_out": false,
  "_shards": {
    "total": 5,
    "successful": 5,
    "skipped" : 0,
    "failed": 0
  },
  "hits" : {
    "total" : 1000,
    "max_score" : 0.0,
    "hits" : [ ]
  },
  "aggregations" : {
    "group_by_state" : {
      "doc_count_error_upper_bound": 20,
      "sum_other_doc_count": 770,
      "buckets" : [ {
        "key" : "ID",
        "doc_count" : 27
      }, {
        "key" : "TX",
        "doc_count" : 27
      }, {
        "key" : "AL",
        "doc_count" : 25
      }, {
        "key" : "MD",
        "doc_count" : 25
      }, {
        "key" : "TN",
        "doc_count" : 23
      }, {
        "key" : "MA",
        "doc_count" : 21
      }, {
        "key" : "NC",
        "doc_count" : 21
      }, {
        "key" : "ND",
        "doc_count" : 21
      }, {
        "key" : "ME",
        "doc_count" : 20
      }, {
        "key" : "MO",
        "doc_count" : 20
      } ]
    }
  }
}
我们可以看到有27个账户在ID(爱达荷州),然后27个在TX(得克萨斯州),还有25个在AL(亚拉巴马州),等等。
注意我们设置了size=0来不显示hits搜索结果,因为我们这里只关心聚合结果。
如下示例我们在上一个聚合的基础上构建,这个示例计算每个state分组的平均账户余额(还是使用默认按count倒序返回前10个):1
2
3
4
5
6
7
8
9
10
11
12
13
14
15
16
17
18
19curl -XGET -H 'Content-Type: application/json' 'http://localhost:9200/bank/_search?pretty' -d '
{
"size": 0,
"aggs": {
"group_by_state": {
"terms": {
"field": "state.keyword"
},
"aggs": {
"average_balance": {
"avg": {
"field": "balance"
}
}
}
}
}
}
'
注意我们是怎么嵌套average_balance聚合到group_by_state聚合中的。
这是一个适用于所有聚合操作的通用模式。你可以任意嵌套聚合,从你的数据中提取你需要的主题汇总。
如下例子依然是在之前的聚合上构建,我们现在来按平均余额倒序排列:1
2
3
4
5
6
7
8
9
10
11
12
13
14
15
16
17
18
19
20
21
22curl -XGET -H 'Content-Type: application/json' 'http://localhost:9200/bank/_search?pretty' -d '
{
"size": 0,
"aggs": {
"group_by_state": {
"terms": {
"field": "state.keyword",
"order": {
"average_balance": "desc"
}
},
"aggs": {
"average_balance": {
"avg": {
"field": "balance"
}
}
}
}
}
}
'
如下示例演示我们如何按年龄区间分组(20-29,30-39,40-49),然后按性别,最后获取每个年龄区间,每个性别的平均账户余额:1
2
3
4
5
6
7
8
9
10
11
12
13
14
15
16
17
18
19
20
21
22
23
24
25
26
27
28
29
30
31
32
33
34
35
36
37
38
39
40curl -XGET -H 'Content-Type: application/json' 'http://localhost:9200/bank/_search?pretty' -d '
{
"size": 0,
"aggs": {
"group_by_age": {
"range": {
"field": "age",
"ranges": [
{
"from": 20,
"to": 30
},
{
"from": 30,
"to": 40
},
{
"from": 40,
"to": 50
}
]
},
"aggs": {
"group_by_gender": {
"terms": {
"field": "gender.keyword"
},
"aggs": {
"average_balance": {
"avg": {
"field": "balance"
}
}
}
}
}
}
}
}
'
这个查询稍微有点复杂,套了三层‘aggs’,需要好好理解一下es的这个语法。