一.关于Spring Boot的配置
Spring Boot 对于开发人员最大的好处在于可以对 Spring 应用进行自动配置。Spring Boot 会根据应用中声明的第三方依赖来自动配置 Spring 框架,而不需要进行显式的声明。比如当声明了对 HSQLDB 的依赖时,Spring Boot 会自动配置成使用 HSQLDB 进行数据库操作。
Spring Boot 的自动配置功能是没有侵入性的,只是作为一种基本的默认实现。开发人员可以通过定义其他配置 bean 来替代自动配置所提供的功能(使用@Configuration注解)。比如当应用中定义了自己的数据源 bean 时,自动配置所提供的 HSQLDB 就不会生效。这给予了开发人员很大的灵活性,既可以快速的创建一个可以立即运行的原型应用,又可以不断的修改和调整以适应应用开发在不同阶段的需要。Spring Boot 使得这样的切换变得很简单。
注意,自动配置永远是第二位的,一旦你配置自己的东西,那自动配置的就会被覆盖。
Spring Boot如何处理多配置
在应用中管理配置并不是一个容易的任务,尤其是在应用需要部署到多个环境中时。通常会需要为每个环境提供一个对应的属性文件,用来配置各自的数据库连接信息、服务器信息和第三方服务账号等。通常的应用部署会包含开发、测试和生产等若干个环境。不同的环境之间的配置存在覆盖关系。Spring Boot 提供了一种统一的方式来管理应用的配置,允许开发人员使用属性文件、YAML 文件、环境变量和命令行参数来定义优先级不同的配置值。
Spring Boot 所提供的配置优先级顺序比较复杂。按照优先级从高到低的顺序,具体的列表如下所示。
- 命令行参数。
- 通过
System.getProperties()获取的 Java 系统参数。 - 操作系统环境变量。
- 从 java:comp/env 得到的 JNDI 属性。
- 通过 RandomValuePropertySource 生成的1random.*1属性。
- 应用 Jar 文件之外的属性文件。
- 应用 Jar 文件内部的属性文件。
- 在应用配置 Java 类(包含
@Configuration注解的 Java 类)中通过@PropertySource注解声明的属性文件。 - 通过
SpringApplication.setDefaultProperties声明的默认属性。
Spring Boot 的这个配置优先级看似复杂,其实是很合理的。比如命令行参数的优先级被设置为最高。这样的好处是可以在测试或生产环境中快速地修改配置参数值,而不需要重新打包和部署应用。
SpringApplication 类默认会把以“–”开头的命令行参数转化成应用中可以使用的配置参数,如 “–name=Alex” 会设置配置参数 “name” 的值为 “Alex”。比如在启动一个Spring Boot项目的时候使用java -jar ${项目名}.jar --server.port=9090命令,则该项目的端口就被设置成了9090.
二.属性(properties)文件配置
属性文件是最常见的管理配置属性的方式。Spring Boot 提供的 SpringApplication 类会搜索并加载 application.properties 文件来获取配置属性值。SpringApplication 类会在下面位置搜索该文件。
1. 当前目录的“/config”子目录。
2. 当前目录。
3. classpath 中的“/config”包。
4. classpath
上面的顺序也表示了该位置上包含的属性文件的优先级。优先级按照从高到低的顺序排列。
对于配置属性,可以在代码中通过“@Value”注解来使用,这点和普通的Spring项目一样。如下例:
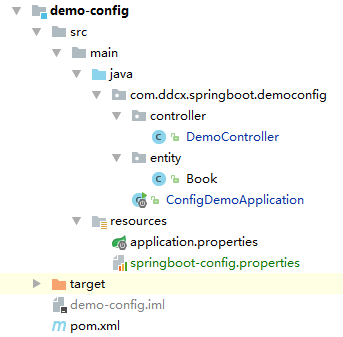
创建一个SpringBoot的Maven项目,项目结构如下:
pom.xml文件中引入Spring Boot Parent和Spring Boot Web的依赖:1
2
3
4
5
6
7
8
9
10
11
12
13
14
15
16
17<parent>
<groupId>org.springframework.boot</groupId>
<artifactId>spring-boot-starter-parent</artifactId>
<version>1.5.7.RELEASE</version>
<relativePath/>
</parent>
<dependencies>
<dependency>
<groupId>org.springframework.boot</groupId>
<artifactId>spring-boot-starter-web</artifactId>
</dependency>
<dependency>
<groupId>com.google.code.gson</groupId>
<artifactId>gson</artifactId>
<version>2.8.0</version>
</dependency>
</dependencies>
在resources目录下创建一个名为application.properties 的文件,将如下内容添加至该文件:
1 | book.name=HongLouMeng |
创建启动类:1
2
3
4
5
6
7
8
9
10
11
12
13
14package com.ddcx.springboot.democonfig;
import org.springframework.boot.SpringApplication;
import org.springframework.boot.autoconfigure.SpringBootApplication;
public class ConfigDemoApplication {
public static void main(String[] args) {
//读取默认配置文件的启动方式
SpringApplication.run(ConfigDemoApplication.class, args);
}
}
再创建一个controller类,在这个类中就可以通过@Value从配置文件中获取配置好的值:1
2
3
4
5
6
7
8
9
10
11
12
13
14
15
16
17
18
19
20
21
22
23
24
25
26
27
28
29
30
31
32
33package com.ddcx.springboot.democonfig.controller;
import com.ddcx.springboot.democonfig.entity.Book;
import com.google.gson.Gson;
import com.google.gson.GsonBuilder;
import org.springframework.beans.factory.annotation.Autowired;
import org.springframework.beans.factory.annotation.Value;
import org.springframework.web.bind.annotation.RequestMapping;
import org.springframework.web.bind.annotation.RestController;
public class DemoController {
("${book.name}")
private String bookName;
("${book.author}")
private String bookAuthor;
("${book.publisher}")
private String publisher;
("${book.price}")
private String price;
("/bookInfo")
String bookInfo() {
return "bookName-->" + bookName + "\nbookAuthor-->" + bookAuthor +
"\npublisher-->" + publisher + "\nprice-->" + price ;
}
}
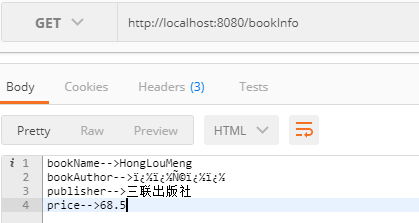
在postman中发送请求得到如下结果:
除此之外,还可以配置服务器端口、数据库等各种配置:1
2
3
4
5# 配置服务器端口为8090
server.port=8090
# 配置应用的根路径,必须以'/'开头,否则会报异常:
# java.lang.IllegalArgumentException: ContextPath must start with '/ and not end with '/'
server.context-path=/demo-config
除了使用@Value注解绑定配置属性值之外,还可以使用@ConfigurationProperties(prefix="book")注解,配置属性中以“book”为前缀的属性值会被自动绑定到 Java 类中同名的属性上,前提是要有属性的set方法。这种方法可以方便地配置数据库。
在这个示例中比如创建一个Book类:1
2
3
4
5
6
7
8
9
10
11
12
13
14
15
16
17
18
19
20
21
22
23
24
25
26
27
28
29
30
31
32
33
34
35
36
37
38
39
40
41
42
43
44
45
46
47package com.ddcx.springboot.democonfig.entity;
import org.springframework.boot.context.properties.ConfigurationProperties;
import org.springframework.stereotype.Component;
//因为要使用自动注入,所以要扫描注册到ioc容器中
(prefix="book")
public class Book {
private String name;
private String author;
private String publisher;
private double price;
public String getName() {
return name;
}
public void setName(String name) {
this.name = name;
}
public String getAuthor() {
return author;
}
public void setAuthor(String author) {
this.author = author;
}
public String getPublisher() {
return publisher;
}
public void setPublisher(String publisher) {
this.publisher = publisher;
}
public double getPrice() {
return price;
}
public void setPrice(double price) {
this.price = price;
}
}
在前面缩写的DemoController中自动注入一个Book属性,添加如下代码:1
2
3
4
5
6
7
8private static Gson gson = new Gson();
private Book book;
("/prefixConfigTest")
String prefixConfigTest() {
return gson.toJson(book);
}
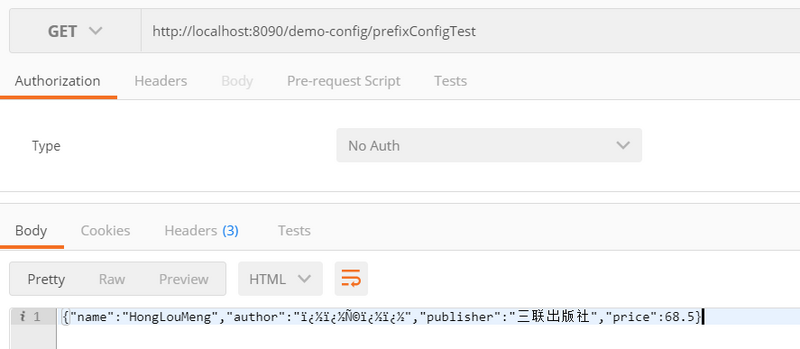
在postman中测试表明也可以获取到application.properties中的配置,并且服务器的端口配置也可以同时得到验证:
SpringBoot 如何更改默认配置文件的名称
前面讲到,默认情况下SpringBoot 会去指定的路径下搜索文件名称为 application.yml、application.properties的配置文件,那如何自己定义配置文件名?
在SpringBoot中可以通过“spring.config.name”配置属性来指定不同的属性文件名称。也可以通过“spring.config.location”来添加额外的属性文件的搜索路径。如果应用中包含多个 profile,可以为每个 profile 定义各自的属性文件,按照“application-{profile}”来命名。
接下来可以实际操作一下,首先在resources目录下再创建一个 springboot-config.properties 的文件,
并在配置文件中添加内容:1
2
3
4
5book.name=Effective Java
book.author=Joshua Bloch
server.port=8070
在将启动类的启动方式改成如下:1
2
3
4
5
6
7
8
9
10
11
12
13
14
15
16
17
18
19package com.ddcx.springboot.democonfig;
import org.springframework.boot.SpringApplication;
import org.springframework.boot.autoconfigure.SpringBootApplication;
import org.springframework.boot.builder.SpringApplicationBuilder;
public class ConfigDemoApplication {
public static void main(String[] args) {
//读取默认配置文件的启动方式
//SpringApplication.run(ConfigDemoApplication.class, args);
//读取自定义配置文件名的启动方式
new SpringApplicationBuilder(ConfigDemoApplication.class)
.properties("spring.config.location=classpath:/springboot-config.properties")
.run(args);
}
}
访问结果:
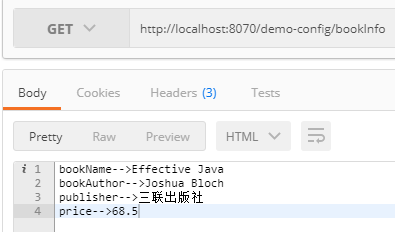
这里会有一个现象,如果 application.properties 和 springboot-config.properties 两个文件同时存在,当application.properties中的配置在pringboot-config.properties也同样配置了,比如上面的bookName,那么pringboot-config.properties中的配置优先级更高,当application.properties中的配置在pringboot-config.properties没有配置,那么application.properties中的那项配置仍然会起作用,比如上面的publisher和server.context-path等。但是如果将 application.properties文件名改成其它的,比如 application-config.properties,则完全以springboot-config.properties这个配置文件为准。
三.YAML配置文件
除了属性文件,SpringApplication 类也提供了对 YAML 配置文件的支持,下面给出了 application.yml 文件的示例。
注意:使用.yml时,属性名的值和冒号中间必须有空格,如branch: master正确,branch:master就是错的。1
2
3
4
5
6
7
8
9
10
11user:
username: 张三
age: 22
contactAddress[0]:
province: hunan
city: changsha
area: yuhuaqu
contactAddress[1]:
province: guangdong
city: guangzhou
area: tianhequ
SpringBoot的配置支持嵌套和几何配置,对于上面的配置,对应如下User和Address两个类:1
2
3
4
5
6
7
8
9
10
11
12
13
14
15
16
17
18
19
20package demoyaml.entity;
import org.springframework.boot.context.properties.ConfigurationProperties;
import org.springframework.stereotype.Component;
import java.util.List;
/**
* Created by liaosi on 2017/10/7.
*/
(prefix = "user")
public class User {
private String username;
private Integer age;
private List<Address> contactAddress;
//get、set方法省略
}
1 | package demoyaml.entity; |
在Controller中添加访问这个配置的user对象的方法:1
2
3
4
5
6
7
8
9
10
11
12
13
14
15
16
17
18
19
20
21
22
23
24
25package demoyaml.controller;
import com.google.gson.Gson;
import demoyaml.entity.User;
import org.springframework.beans.factory.annotation.Autowired;
import org.springframework.boot.autoconfigure.EnableAutoConfiguration;
import org.springframework.web.bind.annotation.RequestMapping;
import org.springframework.web.bind.annotation.RestController;
public class DemoController {
private static Gson gson = new Gson();
private User user;
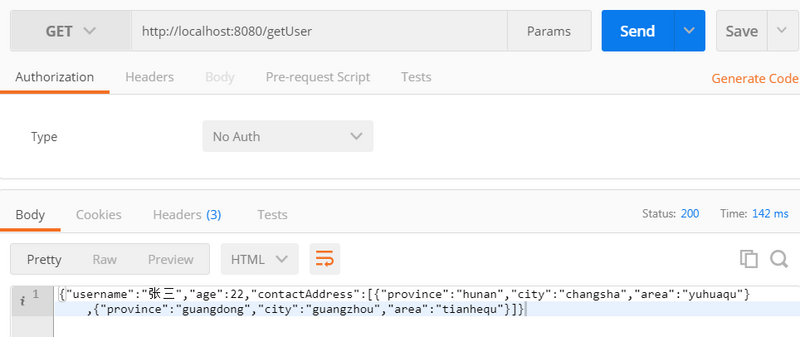
("/getUser")
String getUser() {
return gson.toJson(user);
}
}
访问结果:
注意事项
进制数的转换
场景:
有一个数据库的配置,密码是纯数字并且0开头的,当我们通过字符串方式获取密码的时候会有和我们配置文件中的值不一样。

打印结果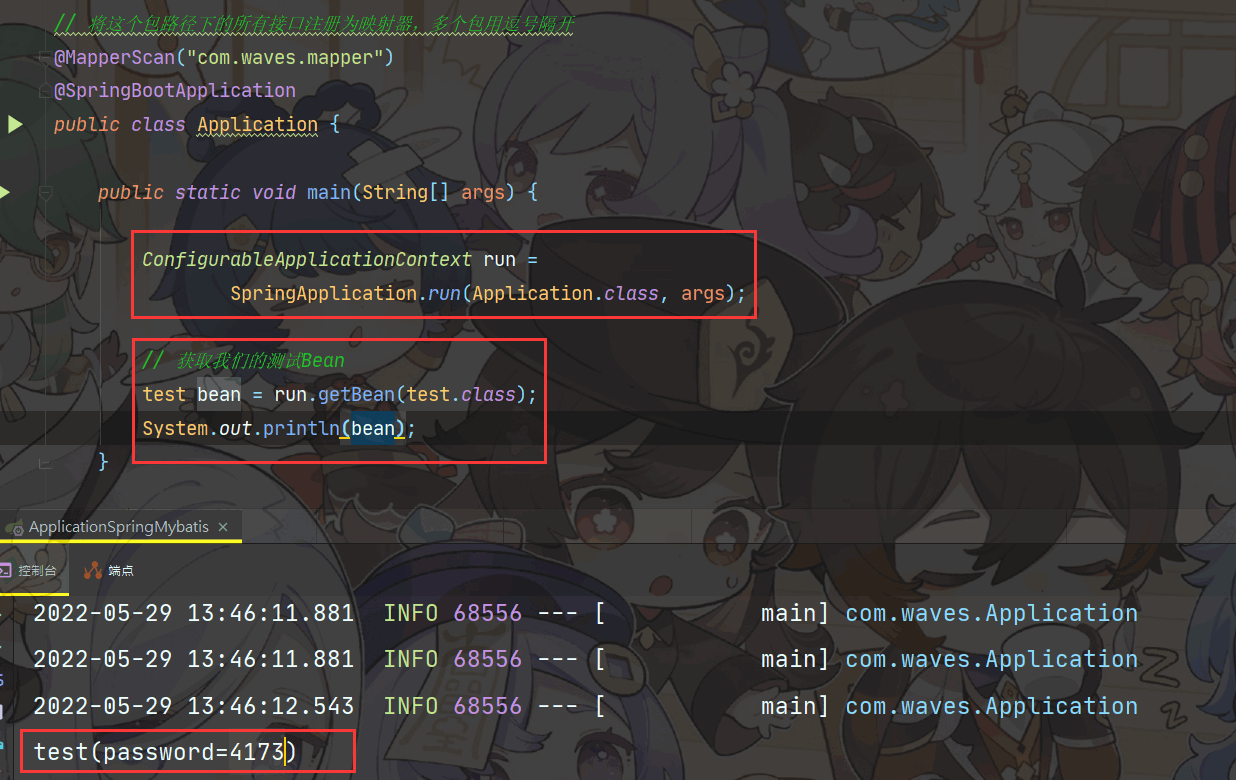
为什么配置文件中明明写的是 010115,为什么打印出来是4173呢?
原因:yaml配置文件对int值支持多种进制,有2进制,8进制,16进制。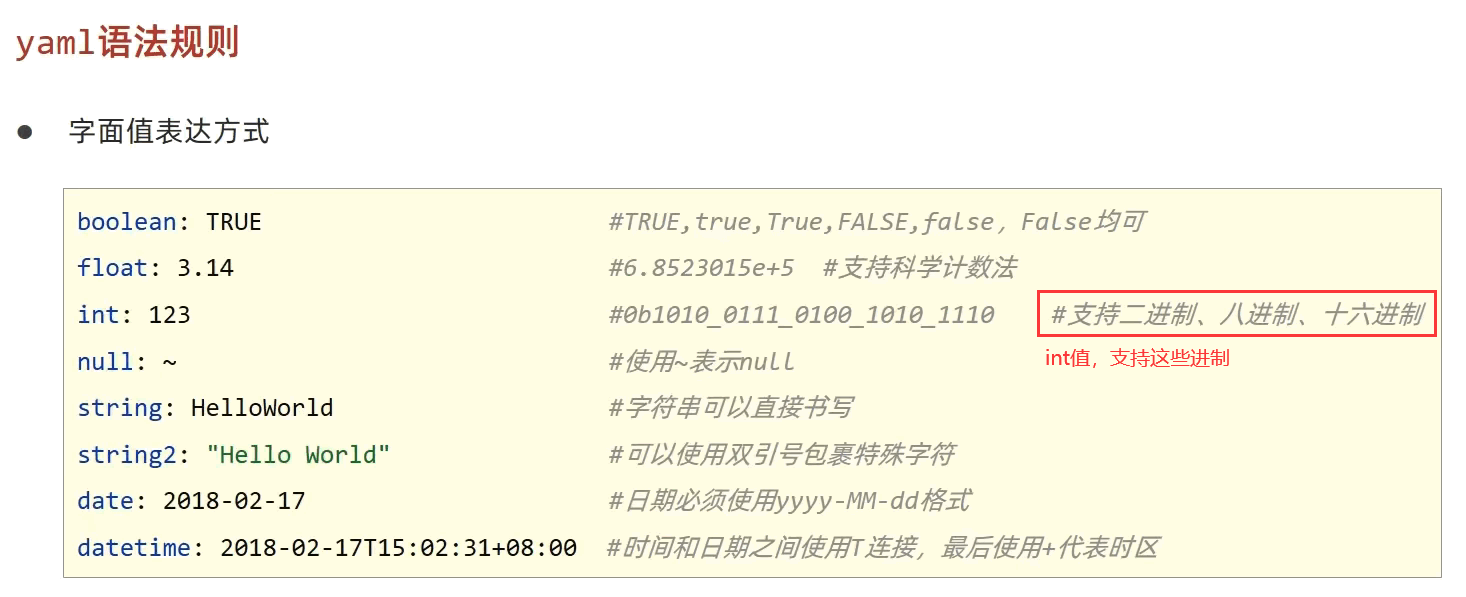
打开windows系统的计算器,就知道为什么010115 会变成 4173 了。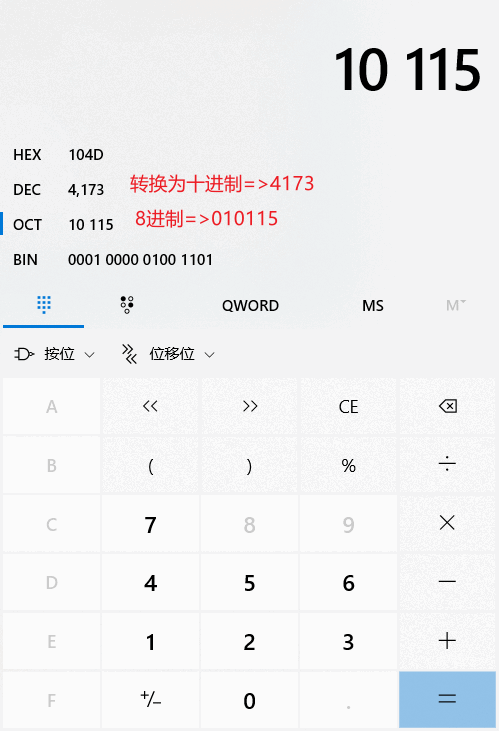
因为配置的密码刚好是以0开头的,然后又恰好后面的数字都只包含0-7,他是一个标准的八进制,所以这个数值就被自动转换成了8进制的值。
四.多环境配置
在实际开发中,通常会有开发、测试、生产等多种环境,SpringBoot是怎么来配置多种环境的呢?
1.properties多环境配置
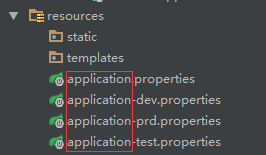
(1)在项目中添加不同环境的配置文件
(2)在application.properties配置文件中配置需要激活那个环境:1
2
3
4#激活哪一个环境的配置文件
spring.profiles.active=dev
#公共配置
spring.jackson.date-format=yyyy-MM-dd HH:mm:ss:
2.yaml多环境配置
在application中增加内容:
1 | #激活哪一个环境的配置文件 |
定义一个DBConfig类,获取激活的那个环境的配置:1
2
3
4
5
6
7
8
9
10
11
12
13
14
15
16
17
18
19
20
21
22
23
24
25
26
27
28
29
30
31
32
33
34
35
36
37
38package demoyaml.entity;
import org.springframework.boot.context.properties.ConfigurationProperties;
import org.springframework.stereotype.Component;
(prefix = "db")
public class DBConfig {
private String url;
private String username;
private String password;
public String getUrl() {
return url;
}
public void setUrl(String url) {
this.url = url;
}
public String getUsername() {
return username;
}
public void setUsername(String username) {
this.username = username;
}
public String getPassword() {
return password;
}
public void setPassword(String password) {
this.password = password;
}
}
通过controller中的方法查看:1
2
3
4
5
6
7
8
9
10
11
12
13
14
15
16
17
18
19
20
21
22
23
24
25package demoyaml.controller;
import com.google.gson.Gson;
import demoyaml.entity.DBConfig;
import org.springframework.beans.factory.annotation.Autowired;
import org.springframework.boot.autoconfigure.EnableAutoConfiguration;
import org.springframework.web.bind.annotation.RequestMapping;
import org.springframework.web.bind.annotation.RestController;
public class DemoController {
private static Gson gson = new Gson();
private DBConfig DBConfig;
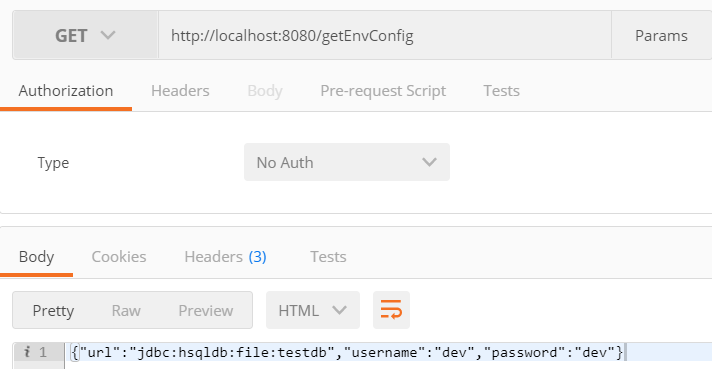
("/getEnvConfig")
String getDBConfig() {
return gson.toJson(DBConfig);
}
}
3.两种配置方式的比较
- Properties配置多环境,需要添加多个配置文件,YAML是即可以把不同环境配置写在一个文件,也可以写多个配置文件。
- 书写格式的差异,yaml相对比较简洁,优雅
- YAML的缺点:不能通过@PropertySource注解加载。如果需要使用@PropertySource注解的方式加载值,那就要使用properties文件。
本节示例代码已上传到GitHub: https://github.com/liaosilzu2007/spring-boot.git