引言
Spring 框架对于很多 Java 开发人员来说都不陌生。Spring 框架包含几十个不同的子项目,涵盖应用开发的不同方面。如此多的子项目和组件,一方面方便了开发人员的使用,另外一个方面也带来了使用方面的问题。每个子项目都有一定的学习曲线。开发人员需要了解这些子项目和组件的具体细节,才能知道如何把这些子项目整合起来形成一个完整的解决方案。在如何使用这些组件上,并没有相关的最佳实践提供指导。对于新接触 Spring 框架的开发人员来说,并不知道如何更好的使用这些组件。Spring 框架的另外一个常见问题是要快速创建一个可以运行的应用比较麻烦。Spring Boot 是 Spring 框架的一个新的子项目,用于创建 Spring 4.0 项目。它可以自动配置 Spring 的各种组件,并不依赖代码生成和 XML 配置文件。Spring Boot 也提供了对于常见场景的推荐组件配置。Spring Boot 可以大大提升使用 Spring 框架时的开发效率,对于快速开发一个可运行的非大型的项目非常合适。
简介
从 Spring Boot 项目名称中的 Boot 可以看出来,Spring Boot 的作用在于创建和启动新的基于 Spring 框架的项目。它的目的是帮助开发人员很容易的创建出独立运行和产品级别的基于 Spring 框架的应用。Spring Boot 会选择最适合的 Spring 子项目和第三方开源库进行整合。大部分 Spring Boot 应用只需要非常少的配置就可以快速运行起来。
Spring Boot 包含的特性如下:
* 创建可以独立运行的 Spring 应用。
* 直接嵌入 Tomcat 或 Jetty 服务器,不需要部署 WAR 文件。
* 尽可能的根据项目依赖来自动配置 Spring 框架。
* 不需要传统的Sring项目繁多的 XML 配置文件。
通过 Spring Boot,创建新的 Spring 应用变得非常容易,而且创建出的 Spring 应用符合通用的最佳实践。
官方文档上有这样一段介绍:
#####Learn what you can do with Spring Boot ?
Spring Boot offers a fast way to build applications. It looks at your classpath and at beans you have configured, makes reasonable assumptions about what you’re missing, and adds it. With Spring Boot you can focus more on business features and less on infrastructure.
For example:
- Got Spring MVC? There are several specific beans you almost always need, and Spring Boot adds them automatically. A Spring MVC app also needs a servlet container, so Spring Boot automatically configures embedded Tomcat.
- Got Jetty? If so, you probably do NOT want Tomcat, but instead embedded Jetty. Spring Boot handles that for you.
- Got Thymeleaf? There are a few beans that must always be added to your application context; Spring Boot adds them for you.
These are just a few examples of the automatic configuration Spring Boot provides. At the same time, Spring Boot doesn’t get in your way. For example, if Thymeleaf is on your path, Spring Boot adds a SpringTemplateEngine to your application context automatically. But if you define your own SpringTemplateEngine with your own settings, then Spring Boot won’t add one. This leaves you in control with little effort on your part.
Spring Boot doesn’t generate code or make edits to your files. Instead, when you start up your application, Spring Boot dynamically wires up beans and settings and applies them to your application context.
Spring Boot doesn’t generate code or make edits to your files. Instead, when you start up your application, Spring Boot dynamically wires up beans and settings and applies them to your application context.
代码示例
1.在IDEA中创建一个项目,和一个helloworld模块:
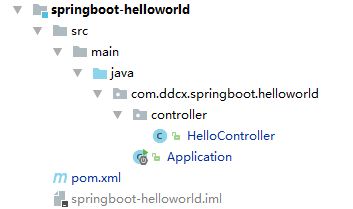
目录结构如图:

在pom.xml文件中引入Spring-boot的依赖:1
2
3
4
5
6
7
8
9
10
11
12
13
14
15
16
17
18
19
20
21
22
23
24
25
26
27
28
29
30
31<!-- SpringBoot 应用都要继承 spring-boot-starter-parent -->
<parent>
<groupId>org.springframework.boot</groupId>
<artifactId>spring-boot-starter-parent</artifactId>
<version>1.5.7.RELEASE</version>
</parent>
<modelVersion>4.0.0</modelVersion>
<packaging>jar</packaging>
<!-- SpringBoot Web 应用需要添加如下依赖 -->
<dependencies>
<dependency>
<groupId>org.springframework.boot</groupId>
<artifactId>spring-boot-starter-web</artifactId>
</dependency>
</dependencies>
<!-- SpringBoot 的maven管理插件 -->
<build>
<plugins>
<plugin>
<groupId>org.springframework.boot</groupId>
<artifactId>spring-boot-maven-plugin</artifactId>
<configuration>
<mainClass>com.lzumetal.springboot.helloworld.Application</mainClass>
</configuration>
</plugin>
</plugins>
</build>
再创建两个类:
第一个是Application.java,用来启动SpringBoot应用:
1 | package com.lzumtal.springboot.helloworld; |
第二个类HelloController.java用来响应web请求:1
2
3
4
5
6
7
8
9
10
11
12
13
14
15
16
17
18
19
20
21
22
23package com.lzumetal.springboot.helloworld.controller;
import org.springframework.web.bind.annotation.PathVariable;
import org.springframework.web.bind.annotation.RequestMapping;
import org.springframework.web.bind.annotation.RestController;
public class HelloController {
("/home")
String home() {
return "Hello World!";
}
("/hello/{name}")
String hello(@PathVariable("name") String name) {
return "hello " + name + "!!!";
}
}
2.运行
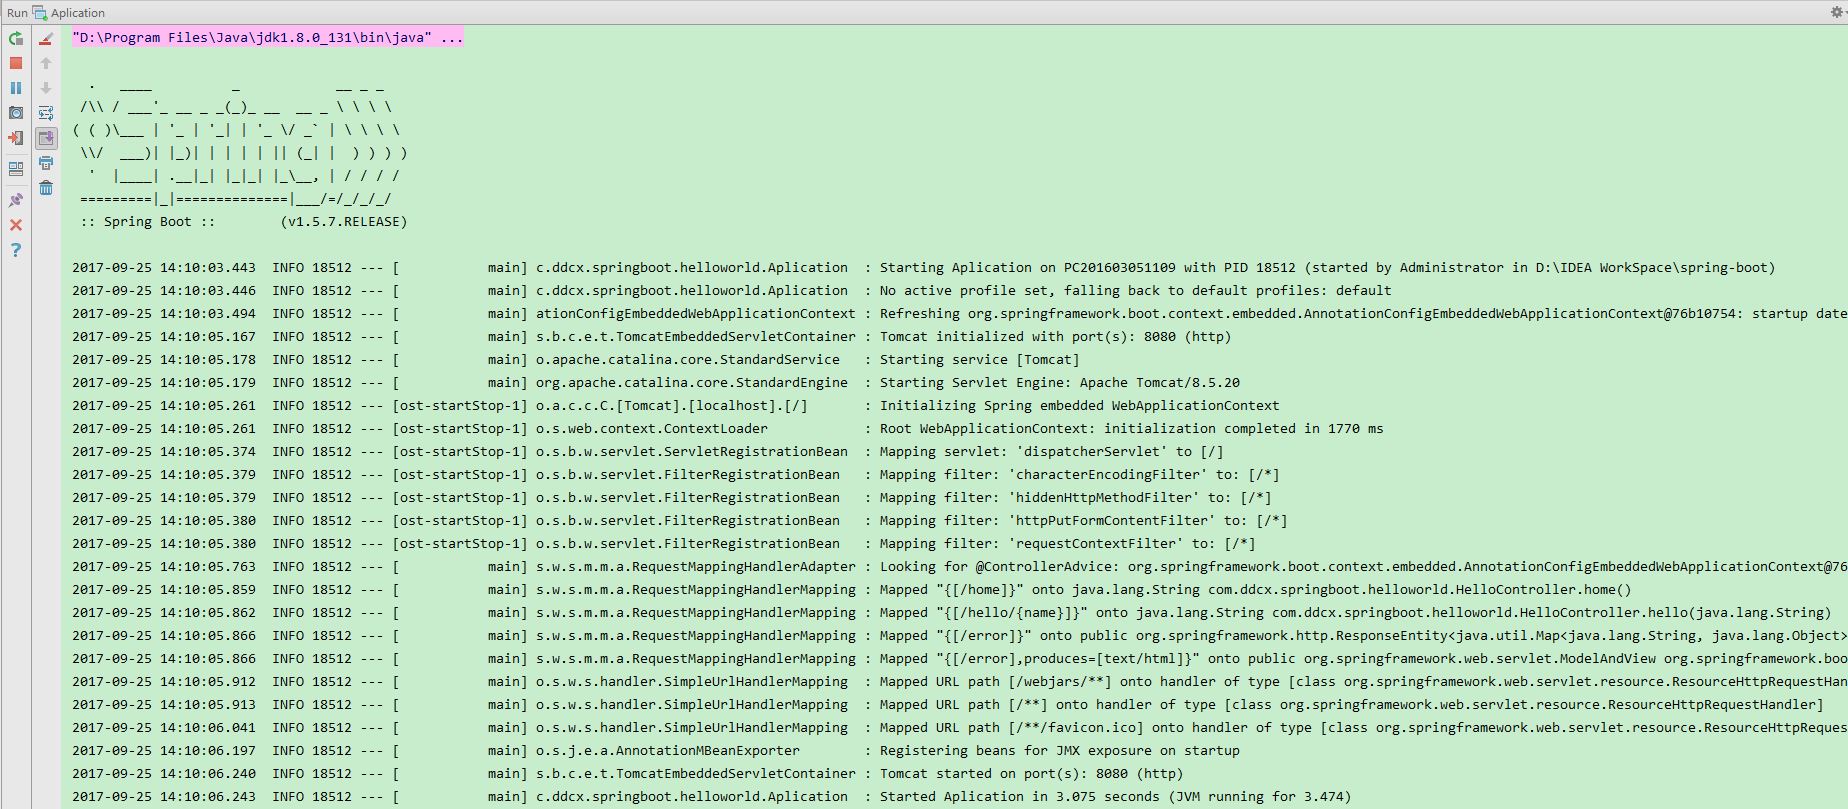
运行Aplication中的main()方法,控制台打印启动信息:
在浏览中访问:http://localhost:8080/home

访问:http://localhost:8080/hello/spring-boot

这样示例就成功运行了。
本文示例代码已上传到github: https://github.com/liaosilzu2007/spring-boot.git